
June 1, 2026
Thermal Scope Settings Explained: Gain, Contrast, Brightness, Sharpness, Zeroing Profiles
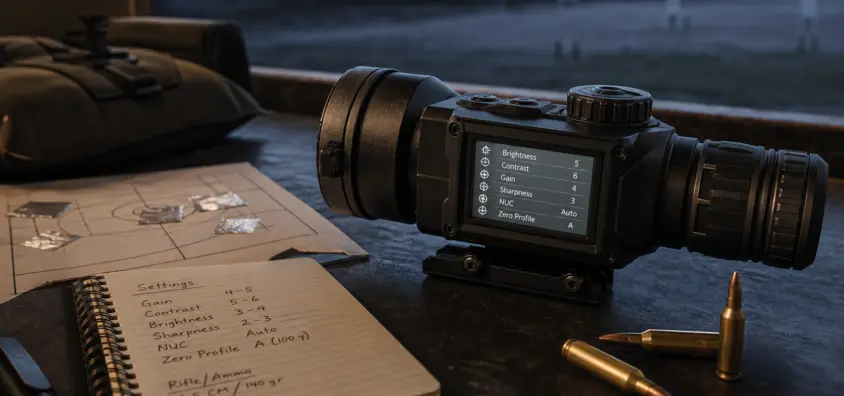
Modern thermal scopes can produce a good initial image without any adjustments at all. However, they will never produce their best image without setting the proper parameters. The trouble is that the menu names can differ. One manufacturer can name the control “gain,” while another will call it “amplification,” “sensitivity,” “enhancement,” “image boost” or “ultra-clear” mode. Brightness may imply either screen brightness or image brightness. Sharpness may work for a foggy night but will make the image harsh. Zeroing profiles will save rifle and zero data, but they cannot replace confirmation of the point of impact with live ammunition.
The aim of this guide is not to offer a universal formula of the ideal settings. Instead, it will explain how to understand the essential image settings, how to adjust them to produce a reliable image, and what common mistakes should be avoided during hunting.
The Short Version
Adjust focus first before touching the image settings. Thermal scopes have separate adjustments for focusing on distant objects and focusing the screen on the eye.
Avoid high screen brightness as long as the image stays visible. A bright display can cause the loss of the dark adaptation, distort the scene, and create the illusion of high-quality.
Increase the contrast to separate the animal from the background but not so much that the scene becomes completely black and white.
Use gain or amplification to boost the weak thermal contrast when hunting under fog, rain, warm or humid air, and over flat terrain where all the objects have almost equal temperatures.
Be cautious using the sharpness feature. A little bit of the edge enhancement can make animal shapes easier to recognize. Too much will cause noisy, fake and distorted images.
Create separate zeroing profiles for different rifles, ammunition types, suppressors, and distances you plan to use. Remember that a saved profile can still shift the point of impact.
Do not trust the saved zeroing profiles until they are confirmed on a target with a thermal-visible aiming point.
First: Focus and Diopter Adjustment Before Settings
Most hunters start adjusting contrast and brightness when it turns out that something else needs to be changed. Thermal scopes can have two separate settings that determine image sharpness.
The first is the diopter setting that adjusts the display to the human eye. The diopter determines how sharp the reticle, menus and icons will appear for the observer. The setting should be adjusted according to the information displayed on the screen.
The second is the focus on the object itself. Usually, a lens or a focusing wheel helps the user achieve proper image sharpness at a certain distance. If the target becomes out of focus, the objective focus should be changed.
If the reticle is blurry, change the diopter value. If the reticle is visible clearly, but the target looks blurred, change the focus adjustment. When both adjustments are needed, start with adjusting the diopter. In the worst case scenario, you will need to adjust both controls to produce a sharp reticle and a clear target.
Pulsar recommends doing the same with their Thermion 2 series: first set diopter according to screen icons, then focus the lens on the observed target and only then change the image settings. That logic proves that image settings work effectively only if the image itself is sharp.
Brightness: Brightness for Visibility, Not Thermal Details
Another frequently misunderstood setting is display brightness. In fact, the adjustment can hardly improve image quality by providing additional information. Instead, it helps to improve the visibility and comfort of the thermal display in dark.
To produce a decent thermal image, you should set the minimum display brightness that allows you to see the reticle, animal and background clearly. This will be different for various terrains, seasons and weather conditions. In the cold and dry environment with open space, low display brightness may be effective, whereas in the thick brush or woods, it would reduce visibility significantly.
One of the main reasons for incorrect brightness is that the hunter tries to compensate for low contrast with higher brightness. The setting cannot change thermal properties of the scene, so the image is going to look washed out. It will also harm dark adaption.
Contrast: Highlighting the Target Among the Background
Contrast determines how much the thermal colors will be divided. In other words, it influences how well you will be able to distinguish animals from background. For instance, when the scene has low thermal contrast or the weather is humid or foggy, the image contrast can make the animal stand out more easily from grass, rocks, brush or trees.
On the other hand, too much contrast will eliminate midtones and make the background look flat. This effect can be undesirable when you try to scan the area for the game.
The logical strategy is pretty simple. Just raise contrast until the animal becomes more visible, but not so much that the background becomes completely flat black or white.
On Pulsar scopes, contrast is among the quick-menu adjustments. AGM’s and HIKMICRO manuals also confirm that the brightness and contrast settings are considered basic image adjustments. The scales differ by manufacturers, but the concept remains the same.
Gain, Amplification, Sensitivity, Contrast Enhancement, and Ultra-clear
Gain and amplification are similar but not identical concepts. Some thermal scopes use “gain” term explicitly. In contrast, N-Vision calls this feature “Contrast Enhancement” and marks it as CE. Some Pulsars refer to this feature as amplification, and InfiRay/iRayUSA offers “Ultra-clear” processing mode in such conditions. These controls belong to the same practical family, although they may differ technically from one manufacturer to another.
Use gain or amplification when the scene lacks thermal contrast. Typical conditions include humid warm nights, fog, precipitation, moist vegetation, sunny warm evening, etc.
With increased gain or amplification, you will be able to separate the weaker thermal contrasts. This will help you spot small animals on a field, coyotes in the bush, etc. At the same time, the thermal image will become noisy and grainy.
When the contrast is strong, the use of high gain can ruin the quality of the image. On a cold night with distinct thermal image, gain may be useless.
The rule here is to use more amplification as long as it is necessary. Start from a moderate value, and increase it as long as there is nothing better left.
Sharpness: Helpful Feature, Easy to Overdo
Sharpness usually implies edge enhancement. It enhances sharp lines and edges. With thermal scopes, it means that ears, legs, backs, fences, brush edges, tree branches can become more pronounced. However, if not used correctly, sharpness can ruin the image.
Use a little bit of sharpness when the image is blurry due to low contrast. It may help edges appear more defined, but it cannot replace proper objective focus. However, sharpness is no replacement for proper focus and image correction. It cannot fix problems with objective lens or a broken scope.
Too much sharpness can create halo effects, increase the amount of noise and add artificial details. Even in the N-Vision’s FAQs, there is a note that too high values of contrast enhancement and sharpness affect font appearance in menus.
As a rule, use only enough sharpness to make borders more visible, but stop just before that line when the image becomes ugly and noisy.
Image Modes and Scene Modes
Another common option of modern thermal scopes is different image modes that can be selected depending on hunting conditions. Typical options are Forest, Rocks, Identification, City, Rain, Ultra-clear and User. The mode usually combines some settings such as contrast, brightness and gain or amplification into a convenient combination for a specific situation.
Treat these modes as useful presets but not the final solution. A Forest mode may work in dense brush, Identification mode will highlight target details, Rain and Ultra-clear modes will help on humid night, and so on. What really matters is how well this mode produces the result in the current conditions.
When the scope provides you with a special User mode, take advantage of it. Pulsar’s manual explains that with the help of User mode you can save preferred brightness and contrast settings depending on the selected operating mode. Since the hunter usually finds his favorite settings, storing them may prove to be very useful in practice.
Color Palette and Settings Go Hand in Hand
Black Hot and White Hot are the most useful palettes for hunting. In Black Hot warmer objects will look darker, and vice versa. Color palettes can be useful in certain situations, but they may prevent you from accurate identification.
Remember that settings for different palettes should be adjusted separately. While one setting works great for Black Hot, it may look excessive in White Hot, and vice versa. Besides, color palettes are less informative for accurate targeting.
The best strategy is to choose your preferred hunting palette and then adjust image settings accordingly. When switching palettes, you will have the opportunity to compare the resulting image with the default one.
Calibration: NUC Makes the Difference
Non-uniformity correction (NUC) is the term used by thermal manufacturers to describe the procedure of recalibration. Many thermal scopes recalibrate the sensor automatically to reduce fixed-pattern noise and keep the image even, but in some cases, users need to close the lens cap manually.
If the image becomes distorted, check if the scope requires recalibration. Most manufacturers recommend closing the lens cap during manual calibration, including Pulsar. According to Pulsar’s description, manual, semi-automatic and automatic methods are available.
NUC does not help you focus the scope; it is used to restore even, distortion-free image. Check if you use the right method and know when and how your scope needs a recalculation.
Zeroing Profiles: What Are They Really For?
Zeroing profiles are the saved aiming setup options. Depending on the model and brand, they may contain information about the reticle position, distance, rifle, ammunition data, etc. Zeroing profiles are extremely helpful for hunting since a hunter will be able to use the scope with various firearms in different conditions.
You may use profiles when there are two or more firearms equipped with the scope. Also, different profiles can be created for various distances and loads. For instance, there can be a Profile A for the 100 yards with .223 coyote rifle, Profile B for 100 yards and .308 hog rifle, and Profile C for a subsonic 50 yards setup with a suppressor.
Never forget that profiles can be very misleading. It is dangerous to select one of the available profiles without checking whether it really matches the current setup. The point is that one scope can have saved data of different distances, rifle and loads. When you pick the wrong one, your point of impact will be inaccurate.
HIKMICRO’s THUNDER manual mentions five zeroing profiles and multiple reticles in each one. AGM Rattler manuals describe profile selection such as A, B, C, D, and E. ATN offers Profile/Zero workflows, while Pulsar scopes use zeroing profiles and distance settings.
How to Zero a Thermal Scope Without Guessing
To zero a thermal scope, use the thermal visible aiming point. In contrast to optical scopes, thermal scopes cannot be used to aim at regular printed paper because they see heat, not light. Possible options include foil tape, a hand warmer, a heated thermal target, or a water bottle with clear temperature difference.
It is recommended to choose a suitable distance for starting. For example, 25 or 50 yards are a good starting point. Find a steady position for the rifle, aim and fire.
Most modern thermal scopes allow freezing image or shooting zeroing image to create a zero setup. Usually, this procedure means firing a shot, keeping the rifle aimed at the original point of aim or freezing the image, then moving the reticle to the point of impact and saving the correction.
Remember that zero should be confirmed with additional shots since otherwise, there will be no guarantee that the saved zero is really accurate. Besides, if a profile contains several zeroing distances, they should be confirmed separately.
Each time you change firearm setup, remove and install a scope, change mounts or ammunition, or if you reset the thermal scope and update its firmware, you should confirm zero again.
Suggested Basic Settings for Thermal Scope
The first thing to do is adjusting diopter to make the reticle and menu text sharp.
Then, focus on the target.
Select White Hot or Black Hot as your hunting palette.
Set display brightness to low or medium.
Adjust contrast to the middle of its range.
Set normal gain, amplification or sensitivity.
Select low or medium sharpness.
Perform a non-uniformity correction or calibration.
Check the scene and settings in real field conditions.
Adjust one setting at a time to see the result.
Create and save your User mode.
These basic suggestions may help you prevent the most common mistake: selecting the maximum value for several settings simultaneously without understanding what it does.
Night Conditions Requiring Image Adjustments
There are typical scenarios that may require changing some image settings. Here are the basic guidelines for the most common situations.
On a cold and dry night when animals are clearly visible against the background – use normal amplification and normal to low contrast, brightness and sharpness settings.
On a warm and humid night, when the image appears to be quite flat – turn up amplification by one notch and raise contrast slightly. Do calibration and focus again, if necessary. In case the image gets too noisy, reduce sharpness before reducing amplification.
In the dense woods and brush – avoid overdoing with contrast because it can destroy background details. Increase brightness to see better and use a bit of sharpness to recognize edges of branches and animal shapes.
On open fields – the use of contrast and sharpness settings is justified because it makes identifying targets on large distances easier.
When hunting around feeders – do not use too high contrast because you will lose background information and safe shooting corridors.
Why Do Settings Change From Night to Night?
Thermal scopes work differently from regular optics since they see heat, not light. What worked yesterday may seem terrible today because conditions have changed. For example, it may rain; this can cool down all surface and lower the thermal contrast. Wind can cool exposed surfaces faster than sheltered areas.
What we mean is that no one can provide you with universal settings because image settings depend on hunting conditions, distance, temperature, humidity, terrain, lens, sensor, display, and your eye. Zeroing depends on the rifle, ammunition, mount, suppressor setup, and distance. The best thermal scope operators know a good order in which they can adjust the scope: focus the image, perform calibration or NUC, adjust brightness and contrast, then tune gain and sharpness.
Source Comparison for Accuracy
I have compared over five sources including manufacturer manuals and official websites. There are some differences in terminology, but the key concepts remain unchanged.
Pulsar Thermion 2 manual and support pages: Pulsar confirms that diopter, lens focus, calibration mode, operating mode, brightness and contrast settings are correct. It also talks about User mode for brightness and contrast and amplification levels such as Normal, High, and Ultra. Source: https://www.pulsar-nv.com/glo/support/manuals/2966/thermion-2-powering-on-and-image-settings/s575/
Pulsar Thermion 2 LRF manual: Pulsar also confirms that it is possible to change gain or amplification levels, set up brightness and contrast and switch User Mode. Pulsar describes zeroing profile information and zeroing distances in a profile in detail. Source: https://pulsarvision.com/app/uploads/manuals/THERMION_2_LRF-XL60-manual.pdf
Pulsar zeroing guide: Pulsar confirms the importance of a thermal visible aiming point and suggests that it can be foil tape, hand warmer or thermal target. Source: https://pulsarnv.com/blogs/news/zeroing-the-thermion-2-riflescope
AGM Rattler LRF manual: AGM describes zeroing profiles, brightness, contrast and sharpness setting and concludes that these are normal settings. Source: https://www.agmglobalvision.com/image/catalog/product-pdf-doc/1747824961_AGM_Rattler_LRF_50-640_Manual_250226.pdf
ATN ThOR 4 and ThOR 6 manuals: ATN describes brightness and contrast settings, sharpness and thermal menu, and profile/zero workflow. ATN also confirms the necessity to use a thermal target for zeroing. Sources: https://www.atncorp.com/manuals/thor-4 and https://www.atncorp.com/manuals/thor-6
HIKMICRO THUNDER thermal image scope manual: HIKMICRO describes brightness and contrast settings and provides information about five zeroing profiles. Source: https://hikmicro.biz/wp-content/uploads/2023/08/THUNDER-2.0_UM_V5.5.60_en-US_20230321.pdf
N-Vision HALO FAQ and NOX manual: N-Vision confirms the importance of using contrast enhancement for low thermal contrast, and sharpness adjustment. It also mentions that high contrast enhancement and sharpness settings can affect font readability. Sources: https://nvisionoptics.com/halo-halo-lr-tips-pointers-faq/ and https://nvisionoptics.com/wp-content/uploads/woocommerce_uploads/2020/11/Nox-User-Manual-Rev-1.1.pdf
InfiRay/iRayUSA RICO manual and product documentation: InfiRay/iRayUSA suggests using ultra-clear type of processing on low thermal contrast conditions. It also mentions automatic correction and one-shot zero functionality. Source: https://docs.irayusa.com/view?file_path=InfiRay_Outdoor%2FRICO_Mk1%2FInfiRay+Outdoor+RICO+MKI+manual_v1.2_06-21-22_web.pdf
Reliability Conclusion
All the sources mentioned here give the same advice for practical use of thermal scopes. First of all, brightness and contrast are standard image adjustment settings that should be tuned by everyone. Then, gain or amplification can be adjusted when required in case of poor thermal contrast. Use sharpness settings with caution since they can cause over-sharpening the image.
The most significant difference between sources is related to terminology only. Pulsar calls the feature “amplification”, N-Vision refers to it as “Contrast enhancement”, InfiRay/iRayUSA names it “Ultra-clear”. As for the adjustment order, each manufacturer creates unique user interface. In general, the best choice would be reading the instruction.
Final Verdict
Thermal scope settings cannot transform an average scope into an ideal tool. Instead, they will allow you to optimize performance for the current hunting conditions. The best thermal image usually includes correct focus, calibration, low to medium brightness, appropriate contrast and gain, and low to medium sharpness.
Zeroing profiles play an important role because they determine the point of impact. They should be created, labeled, and stored to keep track of hunting setups. However, they still need to be confirmed with live fire on a target using the rifle, distance, ammunition, and setup you will use during the actual hunt.
IR Illuminator Not Working With Night Vision? Beam, Battery, Focus and Compatibility Check.
Is your NV not turning on? Battery, Contacts, Mount and Tube-Safe Troubleshooting
Night Vision Collimation and Alignment: Fix Double Vision, Eye Strain and Dual-Tube Setup Issues