
March 24, 2026
How to Mount Night Vision on Your Rifle: Complete Setup Guide
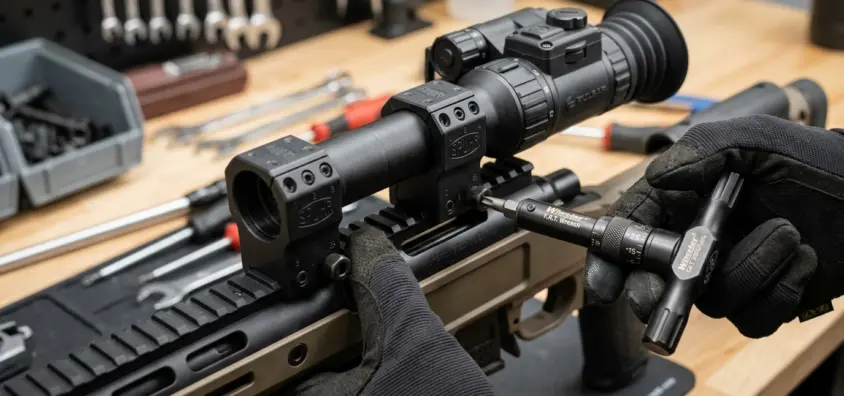
Night vision mounted badly is worse than no night vision. A scope that loses zero after three shots, sits at the wrong height for your cheek weld, or vibrates loose in the field creates problems that no amount of optical quality can fix. Getting the mount right is the foundational step that everything else depends on. This guide walks through the complete process of mounting night vision to a rifle — from choosing the right hardware to verifying zero and checking for common setup mistakes.
Before you get into mounting specifics, read our guide on How to Read Night Vision Specs to understand what you’re working with, and review Night Vision Battery Life so you understand the power management decisions that affect how you configure the setup.
Types of Night Vision Rifle Mounts
Picatinny (MIL-STD-1913) Rail Mounts
The standard for most modern rifle setups. Picatinny rails provide a consistent, standardized interface. Nearly all night vision and thermal scopes ship with a picatinny-compatible mount. Verify the rail on your rifle is a true MIL-STD-1913 spec — some budget rails use slightly narrower or shallower slots that cause fitment issues with some mounts.
Quick-Detach (QD) Mounts
QD mounts allow you to remove and reattach the night vision scope without tools, then return to your daytime optic. Most quality QD mounts maintain zero through multiple removal cycles when properly torqued. The tradeoff: they’re more expensive than fixed mounts and the QD mechanism adds a potential failure point.
For hunters who use the same rifle in daytime and nighttime setups, a QD mount on the night vision scope is the practical choice. For a dedicated night hunting rifle, a fixed mount is simpler and eliminates the QD mechanism as a variable.
Offset and Co-Witness Mounts
Some setups position the night vision optic at a 45-degree offset or co-witnessed above a daytime scope. These configurations allow switching between optics by rotating the rifle without removing any hardware. They work but add complexity — the co-witness requires precise setup and offset mounts change the cheek weld for each optic.
Night Vision Scope Mount vs Front-of-Scope Clip-On
A clip-on night vision adapter mounts in front of your existing daytime scope and converts it to a night system. This is a fundamentally different approach than replacing the daytime scope with a dedicated night vision scope. Clip-ons preserve your daytime zero, require no re-zeroing for the day/night transition, and often cost less per capability unit when you factor in that you’re using optics you already own.
The limitation: you’re putting two optical systems in series, which can degrade image quality and affect eye relief. Our guide to Clip-On Night Vision covers this approach in detail.
Ring Height: Getting It Right
Night vision scopes, particularly thermal units, have larger objective lenses than standard hunting scopes. This typically requires higher rings than your daytime setup. Getting ring height wrong creates problems:
- Too low: objective lens contacts barrel, preventing proper mounting
- Too high: cheek weld is off, inconsistent eye relief, slower target acquisition
- Correct: consistent cheek weld, objective clears barrel by 2-4mm minimum
How to Determine Ring Height
- Measure the objective lens diameter of your scope
- Measure barrel diameter at the mounting location (varies by platform)
- Calculate clearance needed: (objective OD / 2) + rail height + (barrel OD / 2) = minimum ring center height
- Add 2-4mm for safety margin
For most thermal scopes with 35-50mm objectives on standard AR-pattern rifles, medium to high rings (1.00″ to 1.26″ center height) work in most configurations. Verify with your specific combination — don’t assume.
Torque Specifications and Ring Installation
Ring Torque
Under-torqued rings allow the scope to shift under recoil. Over-torqued rings can damage the scope tube. Follow the manufacturer’s torque specification — most quality rings specify 15-25 in/lbs for scope rings. Use a torque wrench; “tighten firmly by feel” is not a repeatable method.
Installation Sequence
- Clean both the rail and mount contact surfaces (debris causes uneven seating)
- Position the mount at the correct location for eye relief (see below)
- Hand-tighten all ring screws uniformly before applying torque
- Apply torque evenly across screws — tighten in an alternating pattern, not sequentially
- Verify the scope is level (use a level on the turret caps)
- Apply final torque to the mount’s rail attachment points
Using Loctite
Low-strength threadlocker (blue Loctite 243) on ring screws prevents loosening from vibration without permanently locking the hardware. Apply sparingly. Do not use medium or high-strength threadlocker on removable ring screws.
Eye Relief Setup
Eye relief on night vision scopes varies by design. Most thermal scopes have generous eye relief in the 50-100mm range. Image intensifier rifle scopes are often more demanding — especially Gen 3 units with tight eye relief windows.
Setting Eye Relief
- Mount the scope loosely in rings (not torqued)
- Shoulder the rifle in your normal shooting position with eyes closed
- Open your eyes — you should see a full, clear image or a centered partial image
- Slide the scope forward or backward until you have a full clear image with no shadowing at your natural head position
- Mark the position, then torque the rings with the scope at that position
Thermal scopes are generally more forgiving on eye relief than image intensifier scopes. Eye relief on thermal units is typically 50mm or more. If you’re seeing a vignetted (shadowed) image, move your eye to the correct position before deciding the scope is defective.
Zeroing Night Vision Optics
Why Night Vision Zeroing Differs from Daytime
Zeroing a night vision or thermal scope involves some specific challenges that don’t apply to daytime scopes:
- Thermal zero can shift with temperature changes — a zero established at 32°F may differ at 85°F
- Point of impact shift between daytime and nighttime (with clip-on NV) is a real phenomenon
- Thermal reticles may have different parallax characteristics than optical reticles
- Battery level can affect display brightness, which affects perceived zero
Basic Zeroing Process
- Start at 25 yards — get on paper first, then extend to your intended zero distance
- Allow the scope to reach thermal equilibrium (turn on 10 minutes before zeroing)
- Use a stable rest — sandbags, shooting rest, or vise-mounted boresighter
- Fire three-shot groups, not single shots, and average the impact point
- Adjust turrets per the scope’s click value (typically 0.1 or 0.25 MOA per click)
- Verify zero at your intended hunting distance (commonly 100 yards)
- Check zero at the beginning of each hunt, especially after temperature changes
For complete detail on the zeroing process including how to handle common problems, see our guide on How to Zero a Thermal Rifle Scope.
Common Setup Mistakes
Not Checking for Scope Movement After Zeroing
After shooting a 5-shot group at 100 yards, gently attempt to rotate the scope in the rings. If it moves, your rings are under-torqued. This is more common than it should be — many shooters apply torque to spec but the scope still has minor movement. Check this before trusting the zero in the field.
Inconsistent Cheek Weld
Night vision scopes are often mounted higher than daytime scopes. If your cheek weld is inconsistent — if you’re craning your neck up to see through the scope — you’ll get inconsistent shots and inconsistent zero verification. Use a cheek riser if necessary. Your shooting position should be natural, not strained.
Ignoring Rail Condition
A rail with burrs, damage, or corrosion prevents proper mount seating. Inspect the rail surface, clean it, and verify there are no bent or damaged cross-slots. A scope mounted to a damaged rail will not maintain zero under recoil.
Wrong Mount for the Platform
Not all mounts fit all rails equally. M-LOK and Keymod rails need appropriate adapters before attaching standard picatinny mounts. ACOG-pattern mounts don’t have the same slot spacing as MIL-SPEC picatinny. Verify compatibility before purchase, not after.
Forgetting to Check Zero After Any Significant Impact
Dropping a rifle, bumping the scope hard against a tree, or any significant impact can shift zero. Field check after any impact by confirming at a known distance. A target at 100 yards that you’re confident about before the incident is enough to verify nothing shifted.
Running Night Vision and Daytime Optics Together
Some setups run a daytime scope and a night vision optic simultaneously. Common configurations:
Clip-On NV in Front of Daytime Scope
Add-on NV unit mounts to the front of the existing daytime scope. The daytime scope’s reticle is used for aiming. The NV unit provides image intensification or thermal imagery. This is the most common dual-use configuration. Major advantage: no need to re-zero when switching day/night. For a dedicated hunting rifle that does both, this is often the best approach.
Separate Mounting Positions
Night vision scope at standard mounting position, daytime scope removed and stored. Simple but requires complete zero verification each time the scope changes. Works for hunters with dedicated hunting rifles and separate daytime and nighttime optics.
Offset Mount
Night vision unit mounted at 45-degree offset from daytime scope. Quick switch by rotating the rifle. Requires getting used to the different aim point and cheek weld for each optic. More common in tactical applications than hunting, but practical for hunters who frequently switch between day and night use.
Battery and Power Setup
Night vision scopes draw power from onboard batteries, external battery packs, or both. For a field-ready setup:
- Know your unit’s battery life and type (CR123A, AA, proprietary, USB-C)
- Carry at least one full set of spare batteries per night
- For USB-C units, a 10,000mAh power bank provides multiple full charges
- Check battery level before every hunt, not after setup
- Test the power supply connection — loose battery contacts are a common cold-weather failure
Frequently Asked Questions
Do I need special rings for a night vision scope?
Not necessarily, but you may need higher rings than your daytime setup. The key requirement is clearance for the objective lens. If your existing rings provide adequate height for the objective diameter of your night vision scope, they’ll work. Verify before assuming.
How many shots does it take to zero a thermal scope?
Expect 15-25 rounds minimum for a complete zero session — getting on paper at 25 yards, adjusting, extending to 100 yards, verifying. Some thermals have boresight features that accelerate the process. Even with boresight assistance, verify with live fire.
Can I mount night vision on any rifle?
Any rifle with a picatinny rail or appropriate mounting surface can accept a night vision scope. Bolt-action, semi-auto, and lever-action rifles all work. The limiting factors are: adequate eye relief for your shooting position, ring height to clear the barrel, and rifle weight — a night vision scope adds 400-700g or more to your setup weight.
Does mounting height affect accuracy?
Mounting height affects the trajectory offset between bore and scope center line, which affects bullet drop at different distances. Higher mounting increases the bore-sight line offset, which can matter for close-range shots. The zero distance you use (25, 50, or 100 yards) compensates for this mathematically. The practical impact for hunting ranges is minimal if you zero correctly for your intended distances.
Final Checklist Before Hunting
- Rings torqued to specification, verified with torque wrench
- Scope doesn’t rotate in rings when moderate rotation force applied
- Eye relief set for natural shooting position without neck strain
- Zero verified at hunting distance within past 2 weeks
- Batteries fresh, spare set in pack
- All rail hardware tight — no movement when pushed laterally
- Scope focus set for primary engagement distance
- Any QD levers fully engaged and locked
A setup that clears this checklist is ready to hunt. Skip it and you’re betting on luck.
IR Illuminator Not Working With Night Vision? Beam, Battery, Focus and Compatibility Check.
Is your NV not turning on? Battery, Contacts, Mount and Tube-Safe Troubleshooting
Night Vision Collimation and Alignment: Fix Double Vision, Eye Strain and Dual-Tube Setup Issues