
June 8, 2026
Eye Relief, Mount Height, Torque and Zero-Holding Basics: How to Mount a Thermal Scope
Mounting a thermal scope isn’t only a bench job. It affects the speed of getting behind the rifle, the readability of the display, the functionality of the controls in low light, and the durability of your zero through recoil, trucks, tripods and cold nights in the field.
A thermal scope can have a good sensor, clean reticle, useful profiles and a sharp focus ring and still just feel wrong on the rifle. Most mounting issues are due to simple issues: the optic is too far up front, the height of the mount is fighting the cheek weld, screws were tightened “by feel,” or the hunter simply zeroed the rifle once and forgot about it.
This thermal scope mounting guide is not a brand-specific manual. It’s an easy setup process for AR-15s, AR-10s, bolt-action rifles and popular hog and coyote hunting rigs.
The Short Version
- Align the thermal scope mount with the optic body and rifle rail. Not all Picatinny, Weaver, ring and one-piece mount interfaces fit the same.
- Eye relief distance is not a perfect bench posture, it is the distance from where you actually shoot the gun.
- On AR-15 and AR-10 rifles, the scope mount should stay on the upper receiver. Never use a rifle scope mount to join the upper receiver and handguard.
- Select thermal scope mount height for head position, cheek weld and field use first.
- Use manufacturer’s torque specifications for the optic and mount. Don’t guess, and don’t use forum universal numbers.
- Before final tightening, inspect the control clearances of the following: focus ring, battery cap, charging port, buttons, QD lever, and lens cap.
- Once mounted, bore-sight if applicable, and then confirm by live fire. For the detailed zeroing process, read NV Guide USA’s article on how to zero a thermal rifle scope.
- Reconfirm zero after changing scope mounts, hard transport, significant impact or any suspicious change in point of impact.
Why Thermal Scope Mounting Is Different From a Day Scope
You Are Not Looking Through Glass, You Are Looking at a Screen
The traditional day scope will produce an optical image. A thermal rifle scope shows information on a digital display. This alters the sensations of eye relief, brightness, focus, and head position. You’re not simply aligning the glass, you’re attempting to view the entire screen, reticle, menus, status icons, and image detail without tilting your head.
Eye Relief and Head Position May Be Less Forgiving
Thermal scope eye relief should be adjusted based on how you shoot. If you are going to hunt standing from a tripod, test it from the tripod. Test it from a field chair when sitting. When using a bolt gun prone, test prone. What is comfortable when sitting square at a bench could be very uncomfortable when twisted to a sounder of hogs or when stationary on a coyote stand.
Weight, Balance and Controls Count at Night
Thermal scopes tend to be heavier and bulkier than what many users expect, particularly those with larger lenses, removable batteries, rangefinding or recording modules. Before final torque, rotate your hand around the optic as you would in the dark with gloves. Is it possible to reach the focus ring? Is the battery cap removable? Does the port for charging clear the mount? These details are more important when you’re working at night than on a clean workbench.
Start With the Rifle Platform
AR-15 and AR-10 Thermal Scope Mounting
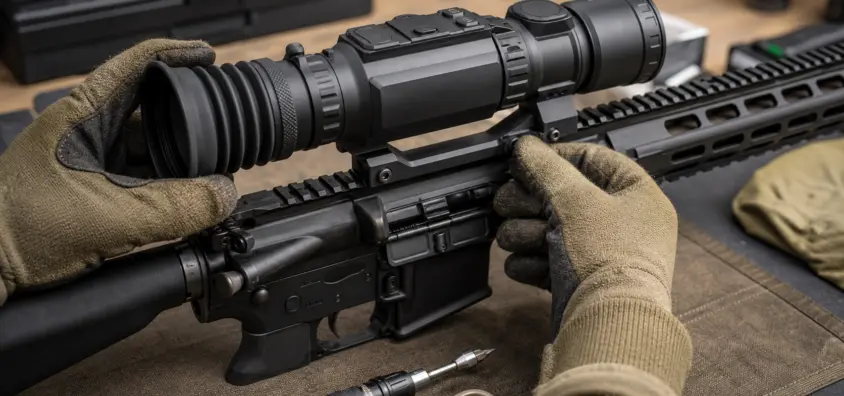
A thermal scope on an AR-15 rifle generally works best with a solid one-piece mount or a thermal scope cantilever mount, which attaches to the upper receiver and moves the scope far enough forward for the correct eye relief. Three things you should test early: the mount is fully on the receiver, the charging handle is still functional, and your cheek weld is repeatable with your real stock position.
AR-10 and .308 setups are heavier and recoil a bit more. Use a mount and optic rated for the rifle and verify zero with live fire. Never assume the thermal scope holds zero just because the mount looks solid. Optics for AR rifles, in general, are covered in NV Guide USA’s thermal scopes for AR-15 setups.
Bolt-Action Rifle Mounting
The process of mounting a thermal scope on a bolt-action rifle platform may not be as straightforward as an AR. Rail length, ring spacing, comb height, bolt clearance, and recoil are all important factors. Sometimes, separate thermal scope rings are effective when the scope tube, rail position and spacing permit. A one-piece thermal scope mount might be easier to align, but can be more restrictive for shorter rails.
Suppressed Rifles and Tripod Setups
The rifle’s handling will differ with suppressors, tripods, lights, external battery packs, and larger thermal optics. A thermal scope for hog hunting setup could spend more time on a tripod than on a bench. A coyote hunting scope setup might require a thermal scope to swivel effortlessly from a sitting position without forcing your head off the stock. Set the rifle up as a field system, not a bare rifle placed on a mat.
Selecting the Thermal Scope Mount
One-Piece Mount vs Separate Rings
A one-piece thermal scope mount is generally a much more straightforward procedure. It will maintain the rings in alignment, make the installation cleaner and work well on AR platforms. If you’re going to use separate rings, it may save weight and provide greater placement flexibility on some bolt guns, but you’ll have to pay closer attention to the ring alignment and spacing.
Cantilever Mounts Are Designed for AR Platforms
A thermal scope cantilever mount keeps the base on the upper receiver, with the scope pushed forward. This is handy as many thermal scopes require more forward placement than a straight mount allows on an AR. It is not about style, it is about having eye relief without employing the handguard as a scope base.
Quick Detach Mounts: Convenient but Not Magic
A quick-detach thermal scope mount is convenient if you are changing optics from rifle to rifle, disconnecting the scope for transport, or changing between day and night optics. Even if a mount is “repeatable,” this does not mean it always returns to exact zero on every rifle, rail, temperature and handling condition. When hunting after removing and reinstalling the scope, check zero.
Picatinny, Weaver and Rail Fit
Today, most thermal rifle scope setup jobs involve a thermal scope Picatinny rail, but not every mount fits every rail, so don’t assume. Picatinny and Weaver are not the same, and the quality of rails varies. The mount should sit flat and tight and not wobble when hand pressure is applied.
Mount Height and Height Over Bore
Mount Height: Why Cheek Weld and Comfort Change
Mount height is an ergonomics decision first. A more heads-up posture on an AR may be achieved by using a taller mount, which could help with tripods, standing shots, masks and heavy clothing. For some bolt guns and prone rifles, a lower mount can be used to achieve a firmer cheek weld. No one size fits all for height.
Close Range Offset and Zeroing Implications
Thermal scope height over bore has an impact on close-range point of impact relative to the reticle. The higher the optic is above the bore, the more mechanical offset you need to understand inside your zero distance. When mount height is varied, the rifle should be treated as needing a fresh zero.
How to Use a Taller Mount When It Makes Sense
A taller mount might be more appropriate for heads-up AR shooting, tripod hunting, winter layers, helmet or ear pro, and hunters who find it hard to get low behind the stock.
If This Is the Case, a Lower Mount Might Make Sense
A lower mount might be more appropriate on bolt guns, prone rifles, shorter-stature shooters and situations where a consistent cheek weld rather than heads-up posture is more important. Simply ensure that the objective bell, focus ring, battery chamber and lens cap do not get in the way of the barrel and rail.
Setting Thermal Scope Eye Relief
Eye Relief From Your Real Shooting Position
Loosen the rings enough to slide the scope, shoulder the rifle with your eyes closed, move into your natural position and open your eye. If the display isn’t centered and complete, adjust the optic. Do this again from the positions you use: standing, seated, tripod, prone, or supported field positions.
Include Clothing, Packs and Night Hunting Posture
The length of pull is different with winter clothes. The rifle pocket can move and head position can change when using a chest rig, backpack strap, call lanyard or heavy jacket. If you mount the scope in a T-shirt at the bench and wear heavy layers while hunting, the eye relief may feel off.
Display Visibility Before Final Torque
Prior to the final torque, ensure that the entire display, reticle, menus, battery status, and the focus position are visible without straining the neck. Check also if the display is usable at night. Refer to thermal scope settings and zeroing profiles for settings that will impact the image after mounting.
Torque, Screws and Recoil: How Zero Gets Lost
Always Use the Manufacturer’s Torque Specs
Thermal scope torque specs are required to come from the manufacturer’s manual of the optic and the mount. The requirements could differ for ring cap screws, crossbolts, base screws or QD levers. Guessing by feel is not a good method, as it can lead to an under-tightened mount or crushed scope tube.
Maintain Surface Hygiene and Utilize Appropriate Equipment
Clean rail, mount, rings and screw threads as directed by the manufacturer. Make sure the bit is the right size to prevent stripping of fasteners. Apply recommended thread locker if it is recommended. Don’t add it just because it seems safer if the manufacturer states not to use it.
Recoil Rating vs Heavy Calibers
Thermal scope recoil rating varies depending on the model. The scope that is perfect on a 5.56 AR might not be ideal with a .308 AR-10, .300 Win Mag bolt gun, or slug gun. Look at the optic and mount paperwork, then test it with live fire.
Common Reasons for Zero Shifts in Thermal Scopes
The majority of times, thermal scope zero shift occurs as a result of normal causes such as loose screws, poor rail fit, movement of the mount, inconsistent QD tension, incorrect zeroing profile, hard impact, ammunition changes, or a rifle that was not zeroed properly after mounting.
Thermal Scope Mounting Checklist: Step By Step
Verify Rifle, Rail and Scope Compatibility
Check tube diameter, mount type, rail interface, recoil rating, objective clearance and whether the optic will physically fit where eye relief requires it.
Mount Correctly on the Receiver or Rail
For ARs, leave the mount on the upper receiver. On a bolt gun, mount securely with a rail or base that provides sufficient placement range and accommodates ring spacing.
Shoulder the Rifle and Set Eye Relief
Do tests from actual hunting positions prior to tightening. Never set eye relief just from the bench.
Level the Scope and Reticle Display
Hold the rifle and display level with one another. Digital reticles still require the optic body and rifle to be mounted consistently.
Tighten Sequentially to the Proper Torque
Tighten slowly and evenly following the manufacturer’s sequence. If the ring design requires gaps, keep the gaps even.
Inspect Controls, Focus, Battery Access and Charging Port Clearance
Make sure there is no obstruction to focus, buttons, caps, QD levers, cables or lens covers. Plan ahead for power and thermal scope battery life prior to the initial hunt.
Bore-Sight if Appropriate, Then Test With Live Fire
Bore-sighting is not a zero, but it may save ammunition. The rifle will still require live-fire testing with the ammunition and configuration you intend to use for hunting.
Zeroing After Mounting
Take Advantage of a Thermal-Visible Target
There is a need for temperature contrast on thermal targets. Depending on conditions, thermal-visible aim points can be used, such as foil tape, hand warmers, heated targets, or sun-warmed material. When planning to use a target, test it first to ensure that you can see it clearly.
Make Sure to Confirm at the Distance You Hunt
There are many different ways to zero a thermal scope after mounting, depending on your property and rifle. A close hog rifle, open-field coyote rifle, AR-15 night setup and .308 pasture rifle may not need the same zero distance. Consider the terrain, safe backstops, average shot distance, and the amount of holdover you can confidently manage.
Remember to Save and Label Zeroing Profiles Carefully
Many thermal scopes have the ability to accommodate several rifles, ammunition loads, or zero profiles. Mark them clearly and use profile selection as an integral part of your pre-hunt procedure. The wrong profile can resemble a mount issue.
Reconfirm Zero After Removing the Scope or Changing Mounts
Reconfirm zero anytime you remove optics, change rings, swap a mount, adjust QD tension or move the scope to another rifle. That is true even if the mount is of good quality and was repeatable in the past.
Typical Thermal Scope Mounting Errors
Too Far Forward or Too Far Back
Neck strain, slow target acquisition and inconsistent head position occur due to bad placement. Adjust the eye relief before pointing out problems with the optic.
An AR Upper Receiver With Handguard
Never attach a rifle scope mount across the upper receiver and handguard of an AR. When under load, pressure or impact, the handguard may shift, and that creates the potential for zero problems.
Choosing Height for Looks Instead of Head Position
A good-looking mount can still shoot poorly. Select height by shouldering the rifle, seeing the screen, and repeating the position.
Ignoring Torque Specs
Please do not over-tighten, as it can damage components. Loose mounting allows movement of the mount. Either can create zero problems.
Forgetting to Recheck Zero Before Hunting
A confirmed zero isn’t something to do just once, it’s part of the hunt. Verify after transport, impact, temperature change or mount change.
Blocking Focus, Battery or Control Access
If it is not possible to adjust the focus, change batteries or operate controls with gloves, the setup is incomplete.
Field Setup Examples
AR-15 Thermal Scope for Hog Hunting
When looking for a thermal scope for hog hunting setup, prioritize manageable rifle weight, fast controls, enough field of view, and a stable tripod position. Standing or a seated tripod position may be more comfortable with a mid-height or taller AR mount, but check cheek weld and close-range offsets. Check out thermal scope field of view for hog and coyote hunting for terrain-specific optic choices.
AR-10 Thermal Scope or .308 Thermal Scope Setup
An AR-10 or .308 setup requires more attention to mount quality, recoil rating and zero confirmation. Clamp it tightly, use torque specifications, and test sufficient groups to assure system stability before putting it in the field.
Coyote Rifle With Thermal Scope: Bolt Action
For a bolt-action coyote rifle, maybe a more traditional, lower cheek weld will work, but only if the display is easy to see. Also, the importance of zero distance, profile management and range estimation increases with longer shots. If your optic is equipped with LRF, develop a disciplined thermal scope rangefinder workflow rather than assuming that distance is automatic certainty.
Scanner and Thermal Rifle Scope Workflow
A handheld scanner changes the role of the rifle optic. You survey and don’t point a rifle at everything that is giving off heat; you figure out what needs attention, and then lift the rifle only when the target, backstop and shot are appropriate. It’s also the point at which the distinction between clip-on thermal and dedicated thermal scope options becomes important for hunters who are creating their complete night hunt setup.
Quick Pre-Hunt Checklist
- Ring and mount screws checked.
- Zeroing profile is correct.
- Zero confirmed after mounting, travel or optic removal.
- Batteries charged and spares packed.
- Focus ring moves freely.
- Display brightness usable at night.
- Lens caps, battery caps and charging ports are accessible.
- If used, QD lever locked and tension checked.
- Backup tool or torque driver packed if applicable.
- Scanner ready so the rifle scope is not used as the main scanning tool.
- Safe backstop and positive target identification remain a part of all shot decisions.
To learn more about thermal education, check out NV Guide USA’s thermal scope reviews and buying guides.
Final Verdict
A thermal scope doesn’t hold zero because it is expensive. It holds zero because the rifle, rail, mount, torque, recoil rating, eye relief and confirmation process all work together.
Image quality matters. As do sensor resolution, lens size, field of view, base magnification and battery life. However, it is discipline at setup time that makes the optic reliable in the field. Mount the scope at your actual shooting position, use the manuals, test with live fire, and re-zero when the system changes.
IR Illuminator Not Working With Night Vision? Beam, Battery, Focus and Compatibility Check.
Is your NV not turning on? Battery, Contacts, Mount and Tube-Safe Troubleshooting
Night Vision Collimation and Alignment: Fix Double Vision, Eye Strain and Dual-Tube Setup Issues