
June 15, 2026
How to Scan with a Thermal Monocular for Hog and Coyote Hunting
A Thermal Monocular is a great piece of equipment for any hunter, especially in the field of hog and coyote hunting.
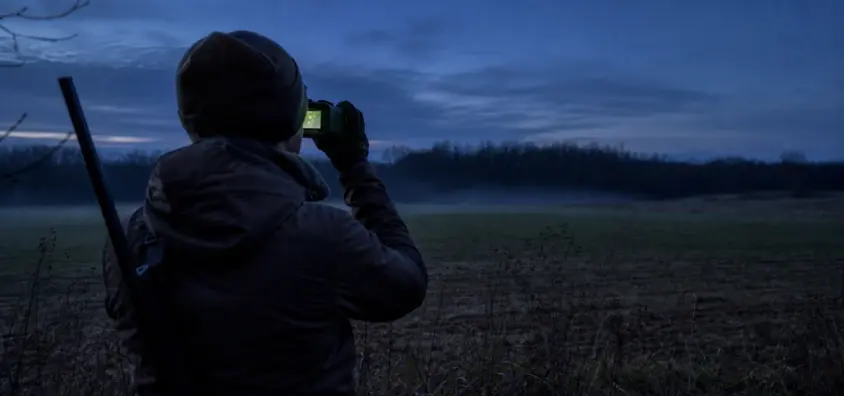
A handheld thermal monocular is the optic that I like to have in my hand before the rifle does for hogs, coyotes and most of my night predator work.
It’s easy why. You can study a field without muzzle pointing at each heat that passes by with a scanner. When used wisely, it will locate animals, inform you of their movement and allow you enough time to make a good call. If not used carefully, it can also lead to the opposite issue: rushed decisions that seem like the right ones, but are not, fast sweeping half-read heat signatures, etc.
Imagine the job like this: the thermal scanner is used to discover and track. Rifle optic is used to confirm the shot picture and aim. One of the best things about thermal hunting is separating the jobs from the partners, livestock, roads, houses, or anywhere an unknown heat signature isn’t a target.
A practical program for scouting in the field for the purpose of hog hunting, coyote hunting, predator control and general night hunting with a thermal monocular.
What Thermal Scanning Does to a Night Hunt
There were many hunters who used the rifle-mounted thermal scope as their primary search tool prior to the wide-spread adoption of handheld scanners. In that limited regard it does work as it indicates heat. However, it’s a bad habit. It’s slower, it’ll tire you out, and it’ll move the muzzle as you explore.
Handheld thermal scanner provides improved observation posture. Seated, standing, tripod or edge of field or an open truck window (when allowed). The rifle remains in a safe direction until a reason arises to call it in the decision. That’s why a separate handheld thermal monocular is one of the first night hunting gear items that I would acquire once the rifle optic itself. For more information on the wider range of scanners, check out NV Guide USA: https://nvguideusa.com/blog/top-thermal-monoculars-scanning-before-shot/
The scope and the scanner are not intended to be substitutes for each other. It shouldn’t attempt to. A Hunting Thermal Monocular is a detection and observation device. If the animal, distance, shot lane and backstop all fit, the optic for the rifle is a controlled shot after the animal.
Thermal Detection Is Not Thermal Identification
Detection Range vs Identification Range
Also, spec sheets can be ambiguous when used as a hunting guide. A unit can sense a big animal at several hundred to several thousand yards. This isn’t necessarily a sign of being able to spot that animal from that distance, nor a sign of having a responsible shot.
Detection is when the optic detects a heat signature. The ability to make a determination based on adequate information, including: what the animal is, its pose, its direction, if non-target animals are within the vicinity, and if the shot is legal and ethical. These are altogether different standards.
If you have a hot spot down the line of a fence, it may be a hog. It could also be a calf, deer, dog, coyote, fox or other warm-bodied animal that will appear. No matter how good the night hunter’s thermal camera is, the situations where brush, humidity, terrain, distance, or angle come into play create a scenario where a blob cannot be identified as a certainty.
Besides Heat, What To Watch?
Instead of just looking at brightness, look at the animals to identify those with thermal:
- The weight and length of body, including off the ground.
- Walking, running and halting skills
- The relative orientation of head and tail.
- Whether the animal is accompanied by or moving with a group
- How it utilizes cover, wind, field edges and low points
- If the size is appropriate for the distance you believe you are seeing
Hogs tend to be lower, heavier and more compact, particularly when in a sounder. Coyotes are lighter, quicker and more apt to pause, angle, circle, or attempt the downwind side of a call. New users of thermal products often mistake the deer for a human, as the heat is evident, but the legs are longer, the posture is different, and the movement is. Coyote stands can be confused by muddying dogs and foxes. When only part of an animal is visible behind a rise or through brush, it can be a serious misunderstanding.
Thermal allows you to view in the dark. It is not an excuse for you to guess the content of what you’re watching.
Set Up Before You Start Scanning
Pre-Range the Field in Daylight
Ideal time for thermal scanning is before dark. Knowing distances in daylight if you hunt a property more than once. Place the feeder, tree lines, gates, roads, creek crossings, water holes, fence corners, buildings, livestock areas, and locations that provide you with a true backstop.
Don’t wait until the animal has begun to move to determine if the far edge is 180 yards or 320 yards. It is not the same as seeing across a field in daylight, and using a thermal display does not allow for depth perception. Knowing a few anchor points, assists in making each successive decision faster and safer.
I am drawn to repeat properties, I like to mentally split the field in my head:
- Near zone: range in which the object is easily identified.
- Middle zone: a possible shot range, when the animal is clear and conditions are good.
- Far zone: detection and observation may or may not be achieved depending on your equipment, conditions and confidence.
- No shot zones: Roads, houses, livestock, property lines, skylines and weak backstops.
When the hunt quickens up, that mental map prevents you from making every decision from scratch.
Check Focus, Palette, Brightness, and NUC
You can have a nice scanner that looks bad if it’s not configured for the field you are looking at. Prior to calling or watching a feeder, practice real terrain at the distance you will be attempting to scan. A setting that works well in the truck might not work at a brush line 200 yards away.
Initially, try to keep the display brightness lower than you would like it to be. If it’s too bright it will wash out the details and make it difficult to not look at the screen when you’re ready to go to sleep. Select a palette which you can read that terrain. The typical choices are white hot and black hot. Some users may find the use of colour palettes useful for distinguishing the different levels of heat, but can’t be used as an improvement to sensor performance. For a detailed explanation on thermal color palettes, check out NV Guide USA’s blog post: https://nvguideusa.com/blog/thermal-color-palettes-explained/
Be aware of NUC – calibration. If the image begins to look smeared, grainy or uneven, the unit might need a calibration cycle. Some scanners will do this automatically with a click, others will allow you to trigger this manually. NV Guide USA explains that click here: https://nvguideusa.com/blog/thermal-nuc-explained-why-your-scope-clicks/
Begin Wide, Not Zoomed In
Increase the level of magnification starting from the base level. The first hog that steps out of a creek bottom, or a coyote that is scooting along the brush, is a good case of a wide field of view. Digital zoom makes the subject appear larger, and can be the cause of the animal being overlooked as it comes in from the side.
If you detect a zoom, use it, if you detect it too early, it is not a zoom. In thermal, the size of the lens and the field of view are always in conflict with each other. A bigger lens will provide more detail at distance, at the expense of width. Here is the lens-size trade off explained by NV Guide USA: https://nvguideusa.com/blog/thermal-scope-lens-size-19mm-25mm-35mm-50mm/
A Real Life Thermal Scanning Pattern
Slow Down Enough to Read the Image
The most common error of the beginner is to rewind too quickly. Thermal is not “daylight” binocular glass. It will be a moment for the display and the eye to settle. Small animals and small heat signatures are lost in the background if swept hard across a pasture.
Follow tight, straight curves. Take a step, stop, read the picture, step again. The right rhythm usually feels too slow in the beginning, on a larger field the rhythm would be: scan, pause, check the edge, shift 1 field-width, pause again. That is typically when the first shape is seen moving out of cover, rather than seeing the group once it has begun to move.
Work the Terrain in Zones
Random scanning leaves holes. Divide the terrain into sections and run the scans in the same sequence as you did last time:
- Immediate foreground and near ground.
- Mid-field openings
- Farm buildings and trees at side boundaries
- Fence lines, gates and corners.
- Sites such as creek bottoms, terraces, and low areas.
- Border of crops, muddy spots, paths
- Locations of known travel lanes and approaches downwind
After completing the field, repeat the process. In 30 seconds, an empty edge can be changed. Hogs can sneak up from a side, while you’re focused on the feeder. You can be stuck on the open center of the field as a coyote crosses the far end.
Recheck Hot Spots Before You Trust Them
Not all types of hot spots are animal related. All of that—warm rocks, fence posts, machinery, cattle, bare dirt, brush, and recently used equipment—can throw confusing signatures. Normally, thermal cannot see through glass, walls, dense bush or bad weather. It perceives heat contrast, and the contrast varies according to the conditions.
If the signature is misaligned or doesn’t seem to be quite right, watch the signature. If possible, move your stance. Watch for legs, head motion, repeated actions, landmarking and any "animal" movement of the heat source as opposed to just warm object.
Bad calls are saved with patience.
Scanning for Hogs
Where Hogs Often Show First
The key to watching for thermal scanning in hog hunting is mostly all about watching transitions. Hogs can be found at feeders, edges of crops, creek bottoms, muddy areas, brush openings, corners of fields, or senderos. They do not necessarily step out on the field and call themselves out. Many times one or two shapes will appear in the edge, and the remainder of the sounder will follow.
Examine where hogs are likely to go, also how they might get there. One person looking at the feeder only might not see the group forming in the brush or traveling towards an escape lane.
How Hog Groups Look in Thermal
A sounder with low, heavy heat signatures will generally form a loose grouping. They can gather together, move apart, feed with their heads down and may move in a herd. Gos are smaller and heavier set than deer.
One boar may be more of a challenge. It can be pendent or attached to cover, or larger than it should be. Don’t take the size of a heat source as it’s the one you should shoot. Read around it. There may be something such as small pigs, deer, livestock or property features that are in proximity but not readily apparent.
Common Hog Scanning Mistakes
These errors repeat themselves again and again:
- Too quick and not capturing the first animals
- Zooming in and out of the group context.
- Keeping an eye on the loudest hotspot as the rest of the sounder travels
- After shooting the first shot, forgetting to look for escape routes.
- Every low heat signature near a feeder is not a hog.
If it is concerned with population control, then what is observed before shot is significant. Understand the numbers of animals, the areas that they feed in and the areas where they will most likely run.
Coyote and Predator Scanning
Why Coyotes Are Harder to Confirm
Thermal scanning for coyote hunting is a different game than scanning for hogs. Coyotes are not as big, as fast or as bold. They stop, turn, circle down wind, take low ground and are sometimes not on the ground that you’re expecting. From a distance they may appear to be dogs, foxes or another animal.
This is where discipline comes into the picture. All of these are considered: body shape, gait, behavior and approach path. A coyote that approaches a call can walk with intent, pause to listen to the call, and attempt to use wind and cover. However, behaviour alone doesn’t prove. Wait if the animal is too far, partially hidden or close to houses or livestock.
In the case of rifle optics, NV Guide USA has a complete guide to the best thermal optics for coyote hunting here: https://nvguideusa.com/blog/best-thermal-scopes-for-coyote-hunting-2026/
Scan Around the Call, Not Just the Open Ground
Before first call, photograph the entire area. You don’t want to "add" sound to what has already been heard in the field. Pause following each calling sequence and listen for an animal approaching without crossing the open field on the downwind side, at field edges, ridgelines, brush openings, or in low draw.
Don’t be distracted by a "cleanest shot". Coyotes tend to reveal their presence when the land is flat, or when they find wind breaks. If hunting with a partner, one can remain wide on the scanner and the other can take position when it is safe for the shooter.
When to Move from Scanner to Rifle
Only approach the rifle once the major questions are answered:
- Direction: What relative position is the animal in, to a set landmark?
- Distance: Can you see and shoot safely and within a distance?
- Identify the target species: Do you have confidence that it is the legal target species?
- What is behind the Backstop?
- Shot lane: Does it lack brush, livestock, road, buildings and property boundaries?
If you get unclear answers, remain on the scanner. Better to watch but don’t push into an unknown situation with the rifle.
Scanner-to-Rifle Transition
Keep the Two Jobs Separate
The scanner finds. The rifle verifies and targets. This is the fundamentals of thermal hunting safety. A thermal on a rifle is not a "casual search" device, particularly when looking for partners, livestock, roads, houses or a stranger’s heat signature.
It goes for both dedicated thermal scopes and clip-on thermal scopes. For comparison NV Guide USA has the following article: https://nvguideusa.com/blog/clip-on-thermal-vs-dedicated-thermal-scope/
Use Landmarks So You Don’t Lose the Animal
But it’s the change from scanner to rifle that a lot of hunters miss the animal. The solution is to attach it prior to any moving.
Never say to yourself "coyote in the field. That is too vague. Imagine that a coyote is 20 yards away from a single cedar tree and is walking to the low fence gap in a right direction approximately 180 yards. Use feeder legs, fence posts, tree trunks, field corners, terraces, brush openings or crop row edges for hogs.
If on your own, softly announce the landmark before switching. With a partner, give the shooter brief, helpful information.
Communicate Clearly with a Partner
Here is a clear example of good field communication:
- Two pigs at the extreme left feeder leg, 120 yards to the right.
- Right of the cedar, 200 yards, coyote on the downwind edge.
- Don’t shoot – there are deer behind it.
- "Stop! An unidentified animal is close to the fence line.
- Animal is clear, "Backstop is dirt bank.
When there are twelve trees, "Over there" and "by the trees" isn’t much assistance. The pieces are direction, distance, animal type, movement and backstop.
Thermal Settings That Help Scanning
White Hot, Black Hot, and Color Palettes
White hot can distinguish an animal from other animals. Black hot can provide some users with a cleaner outline and less eye strain. In some situations, colors would be helpful, but that’s still a display decision. They don’t make the sensor see beyond what they see.
Use the palette that allows you to see shape and movement easiest, and practice with it until you develop pattern recognition skills.
Brightness and Contrast
Excessive screen brightness is an actual issue. Can diminish detail and make the screen harder on the eyes each time you return to the dark. Begin lower than you think needed and only adjust as much as it will be possible to read the scene.
Contrast should provide separation between animals and background but not make everything solid block. Thermal contrast can be lowered by any of the following conditions: warm ground after a sunny day; high humidity; fog conditions; rain; and sharp temperature differences. In poor conditions, ease up and reduce range of confidence in identification.
Digital Zoom Helps After Detection
Digital zoom is helpful when you found something and need to view it closer to see the shape, movement or location. A poor search technique that reduces the "field" of view and generally renders the image rougher.
The field rule is: scan wide, confirm tighter. For more information on base magnification vs digital zoom, check out this NV Guide USA article: https://nvguideusa.com/blog/thermal-scope-magnification-base-vs-digital-zoom/
Thermal Scanner Safety Rules
Never Shoot at Heat Alone
A heat signature is not the identification of a target. It’s just an excuse to watch some more. If you cannot see the animal, be able to estimate the distance and verify the backstop, then you have no shot.
That’s when the hunt starts to pick up that the rule is put to the test. Hogs start leaving. Almost in the brush is a coyote. A partner whispers, "The animal is running away." That doesn’t change the standard.
Confirm the Backstop and the Legal Target
Muzzle direction is not the only thing that is important for thermal hunting safety. Knowing what’s behind the animal and whether or not the animal is legal under the rules for the state, species, type of land and season. The rules for night hunting differ, and some of the specifics may change based on predators, hogs, public land, private land, artificial lights, thermal optics, suppressors, and method of take.
Please consult state-specific information prior to the hunt. For more information on night vision hunting laws by state, check out this resource by NV Guide USA: https://nvguideusa.com/night-vision-hunting-laws-by-state/
Take into consideration livestock, dogs, deer, roads, houses, equipment and property lines. Thermal can help animals to be easy to see, but it can also make the rest of the world seem too simple. There is still the real world.
Know When to Pass
Pass the shot when:
- Low species confidence.
- The reverse side of the coin is not clear.
- Target is partially obstructed by vegetation
- The range is not known or too great to measure.
- Non-target animals are near
- The animal is close to a road, building, skyline or property line
- It can’t be moved properly in the rifle optic
One of being good with thermal is having a clean no shot decision.
Common Beginner Mistakes
Scanning Too Fast
As the panning is fast, it conceals tiny movements and makes the display more difficult to read. Take your time to slow down and stop to process the scene.
Trusting Detection Range Claims
Detection range is not identification range. Use the numbers that are advertised as a guide, not as a permission to fire at a general heat signature.
Running Too Much Zoom
When zooming in too much, the image field becomes smaller and the movement you need to focus on is lost. Look for the first then zoom for the second.
Forgetting Batteries and Standby Mode
Thermal devices burn a lot of power, particularly during cooler weather. Use charged batteries, keep extra batteries or power bank on hand (if applicable), and consider standby mode. For more information on thermal batteries for planning, visit NV Guide USA’s blog: https://nvguideusa.com/blog/thermal-scope-battery-life-internal-vs-removable-batteries-power-banks-cold-weather/
Using the Rifle Scope as the Primary Scanner
A rifle-mounted optic is not a search tool you should use. Always use it to confirm a target, maintain strict muzzle discipline and never track randomly on unknown heat.
Ignoring Weather, Humidity, and Warm Ground
Thermal performance varies with the conditions. Humidity, fog, rain, and warm ground can decrease contrast. Another distraction can be the sun-heated rocks, dirt, posts, and equipment. Instead of forcing a shot, tune in to your confidence.
Practical Field Checklist
Before the Hunt
- State, species, land and season-specific night hunting rules.
- Use range key landmarks in the day.
- Indicate no-shot areas and safe backstops.
- Fill batteries and carry extra batteries.
- Configure base magnification, focus, brightness, palette and the NUC’s behavior.
- Go over partner communication prior to first stand.
During Scanning
- Begin with a large focal length and a large field of view.
- Only scan in zones and not randomly.
- Slow, stop frequently, and re-check edges.
- Observe gait, shape, height and pattern of the group.
- Assume that remote heat signatures are detection until otherwise proved.
Target Confirmation
- Verify species, distance, orientation and shot lane.
- Look for livestock, deer, dogs, roads, buildings and property lines.
- Verify the backstop before the rifle gets involved.
- When using a digital zoom, make sure it aids confirmation.
Scanner-to-Rifle Transition
- Secure the animal to an object.
- Give commands for direction, animal distance, direction, movement, and backstop.
- Only move to the rifle if identity and safety checks are good.
- DO NOT go back to the scanner to search in the scope.
Post-Shot Follow-Up
- Continue to scan post shot.
- Monitor routes and groupings for escape.
- Record the last known position with respect to landmarks.
- Verify conditions for moving before doing so.
- Always use the scanner to aid recovery, but do not automatically select the downed animal because it is hot.
Bottom Line
Good thermal scanning isn’t waving a nifty optic around until it glows. It is a field routine that is repeated; scan wide, slow; divide terrain by zones; read animal behavior and context; confirm identity within realistic distance; move to the rifle only when animal, distance, shot lane and backstop are clear.
One of the best pieces of gear a nocturnal hunter can take is a handheld thermal camera that allows them to observe without aiming. That not only increases the efficiency of hog and coyote hunting, but safety is the bigger issue. The scanner allows you to find out what’s there before the rifle makes contact. To find more practical thermal optics guides, check out NV Guide USA’s thermal section: https://nvguideusa.com/type/thermal/
IR Illuminator Not Working With Night Vision? Beam, Battery, Focus and Compatibility Check.
Is your NV not turning on? Battery, Contacts, Mount and Tube-Safe Troubleshooting
Night Vision Collimation and Alignment: Fix Double Vision, Eye Strain and Dual-Tube Setup Issues