
April 13, 2026
Night Vision Field of View: Wide vs Narrow and Why It Matters for Hunting
This article breaks down what FOV actually means in night vision and thermal optics, how it interacts with magnification and detection range, and which FOV profiles work best for different hunting situations.
What Field of View Means in Night Vision and Thermal Devices
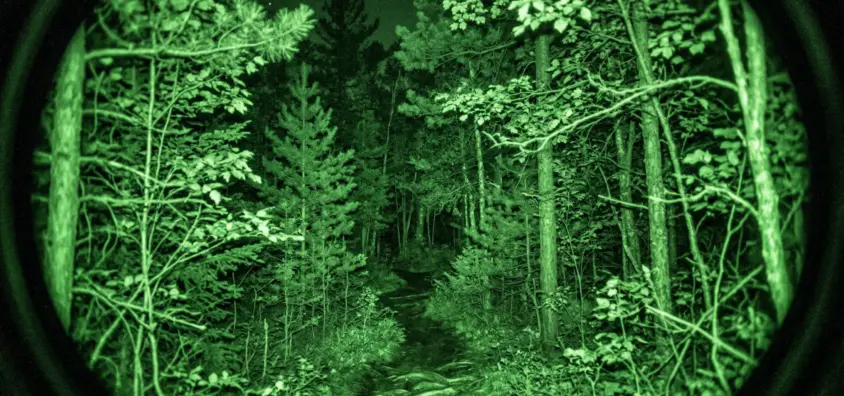
Field of view is the angular measurement of the observable world visible through an optic at any given moment. In night vision devices, this is typically between 8 and 51 degrees, depending on the tube generation, eyepiece design, and magnification. Thermal scopes tend to offer FOV values in a similar range, though the horizontal component is what most manufacturers list.
A 40-degree FOV means you see a 40-degree wedge of the world. At 100 yards, that translates to roughly 73 yards of horizontal coverage. At 200 yards, the same 40 degrees covers about 146 yards. The farther out you look, the more terrain fits inside that angular window.
There are two ways manufacturers express FOV: angular degrees (e.g., 40 degrees) or linear feet at a specific distance (e.g., 36 feet at 100 yards). To convert between them, use the formula:
Linear FOV (ft) = 2 x Distance (ft) x tan(FOV / 2)
This relationship is worth understanding because it tells you exactly how much real estate you’re monitoring at any given range. A scope with a narrow 10-degree FOV at 200 yards covers roughly 35 yards horizontally. A 40-degree FOV at the same distance covers about 146 yards. That difference is the gap between scanning a hillside and staring at a single tree.
How FOV Relates to Magnification and Detection Range
FOV and magnification are inversely related. This is a fixed optical principle — when you increase magnification, FOV decreases. A 1x night vision monocular might offer a 40-degree FOV, but slap a 3x magnifier lens on it and you’re down to roughly 13 degrees. Go to 5x and you’re looking at around 8 degrees.
This tradeoff matters because magnification choice determines what you can do with the optic. Detection range — how far you can spot a heat signature or a moving shape — increases with magnification because the target fills more of the display. But your situational awareness shrinks proportionally.
Thermal scopes illustrate this clearly. A scope running at 1x base magnification might have a horizontal FOV of 18 degrees and can detect a deer-sized target at 800+ yards. Zoom that same scope to 4x and the FOV drops to 4.5 degrees. You can identify the deer at distance, but you’ve lost the ability to monitor the area around it.
The key insight: detection and identification are different tasks, and they demand different FOV profiles. Detection wants width. Identification wants reach.
Wide FOV: Advantages and Tradeoffs
A wide field of view — generally anything above 30 degrees for night vision or above 14 degrees horizontal for thermal — excels at situational awareness. Here’s where it pays off:
Scanning Open Terrain
When you’re working a food plot, a clear-cut, or a sendero, a wide FOV lets you sweep large sections of ground quickly. You pick up movement in your peripheral vision without having to pan the optic deliberately. This is critical for fast-moving targets like hogs running across a field.
Close-Range Engagements
Under 75 yards, a narrow FOV becomes a liability. If a hog is closing distance at 15-20 mph and you’re looking through a 10-degree window, you might lose the animal when it exits your FOV faster than you can track it. A 40-degree FOV gives you time to react, acquire, and shoot.
Walking and Navigation
If you use a night vision device for moving through terrain — still-hunting, stalking, or just getting to your stand — a wide FOV is non-negotiable. Depth perception and peripheral awareness both improve with wider FOV, which reduces the risk of stumbling, making noise, or missing a bedded animal at close range.
The tradeoff: wide FOV means lower magnification, which means targets at distance appear smaller and harder to identify. At 1x with a 40-degree FOV, a coyote at 300 yards is a vague shape. You can detect it, but you can’t positively identify it or place an ethical shot.
Narrow FOV: Advantages and Tradeoffs
A narrow field of view — typically below 15 degrees for night vision or below 7 degrees horizontal for thermal — is the tool for precision at distance.
Long-Range Identification
Detection range numbers on spec sheets tell you when you’ll see a blob. They don’t tell you when you can tell a coyote from a fox, or a doe from a buck. That requires the target to fill enough of the display that features become visible. Narrow FOV (higher magnification) makes this possible.
Target Isolation
In brushy or cluttered environments, a narrow FOV helps you isolate a single animal from the surroundings. You’re not distracted by heat signatures or movement outside your window. This is useful for shot placement when you’ve already located the animal and need to focus.
Stable Aiming Platform
At higher magnification (narrower FOV), small movements of the optic translate to larger movements of the reticle on target. This sounds like a negative, and it is if you’re shooting offhand. But from a rested position, the narrow FOV and higher magnification give you a more precise aiming reference.
The tradeoff: narrow FOV means tunnel vision. You lose situational awareness. If a second animal approaches from the side, you won’t see it. If your target moves laterally, it can exit your FOV before you can track it, especially at close range.
FOV by Hunting Scenario
Different hunts demand different FOV profiles. Here’s a breakdown by the most common night hunting scenarios.
Hog Hunting
Hog hunting is fast and close. Most shots happen under 100 yards, and hogs often move in groups. You need to track multiple animals, identify the biggest one, and get on it quickly. Hogs also move erratically — they can change direction without warning.
Recommended FOV: 35-51 degrees (night vision), 12-18 degrees horizontal (thermal)
A wide FOV lets you keep the group in view while you pick your target. If you’re running a thermal scope with digital zoom, start at 1x or 2x for scanning, then zoom in only for the shot. If you’re using a dedicated night vision riflescope, prioritize low magnification and wide FOV over reach.
The exception: if you’re hunting hogs over bait at a known distance with a stable rest, a narrower FOV with higher magnification can work for precise head shots. But for general hog hunting, go wide.
Coyote Calling
Coyotes respond to calls at variable ranges — 30 yards to 300+ yards. They approach cautiously, often circling downwind before committing. This means you need both scanning capability and the ability to identify and shoot at distance.
Recommended FOV: 20-30 degrees (night vision), 8-14 degrees horizontal (thermal)
A moderate FOV is the sweet spot here. Wide enough to pick up an approaching coyote in your peripheral vision, narrow enough to identify it at 150-200 yards. If you’re using a scanner (handheld thermal or night vision monocular) plus a riflescope, keep the scanner wide and let the scope do the precision work.
Variable magnification shines in coyote hunting because engagement distances are unpredictable. A variable-power optic lets you start wide and zoom in as the coyote commits to the call.
Deer Hunting
Deer hunting under night vision or thermal is subject to state-specific regulations. Where legal, the engagement profile is similar to daytime hunting: moderate ranges, often from a fixed position, with shot placement being critical.
Recommended FOV: 25-40 degrees (night vision), 10-15 degrees horizontal (thermal)
Deer move slower than hogs and coyotes, so tracking speed is less of a concern. The priority is identification (antler size, sex, age class) and shot placement. A moderate-to-wide FOV lets you monitor a shooting lane or food plot, then zoom in for identification and shot.
If you’re hunting from a stand with known shooting lanes, you can go narrower since the engagement area is defined. If you’re still-hunting or stalking, go wider for safety and situational awareness.
Practical FOV Guidelines
Regardless of the species you’re after, a few principles hold:
Match your FOV to the engagement distance. If most of your shots are under 100 yards, prioritize wide FOV. If you’re regularly shooting past 200 yards, you need the narrower FOV that comes with magnification.
Use two devices when possible. A wide-FOV handheld thermal for scanning plus a moderate-FOV riflescope for engagement covers both tasks. This is the setup most experienced night hunters gravitate toward.
Know your device’s actual FOV. Manufacturer specs can be misleading. Some list diagonal FOV to inflate the number. Some list linear FOV at an unspecified distance. Look for horizontal FOV in degrees — that’s the number that matters for comparing devices.
Test FOV in the field. Set up targets at known distances and note how much of the terrain you can see. This gives you a practical reference that no spec sheet can provide.
Consider refresh rate alongside FOV. A wide FOV on a thermal with a slow refresh rate (9Hz) will smear when you pan quickly, negating the advantage of the wider window. For fast scanning with wide FOV, 30Hz or higher is recommended.
Common FOV Mistakes
Chasing magnification at the expense of FOV. More magnification is not always better. A 6x thermal scope with a 3-degree FOV is nearly useless for scanning. You’ll spend more time searching than hunting.
Ignoring FOV when comparing devices. Two scopes with the same magnification can have different FOVs depending on the objective lens and eyepiece design. Always check FOV, not just magnification.
Using a single device for everything. No single FOV profile is ideal for all tasks. If your budget allows, a wide-FOV scanner and a moderate-to-narrow FOV riflescope is the most versatile setup.
Forgetting the FOV-magnification tradeoff with add-on lenses. Slapping a 3x afocal magnifier on a 40-degree FOV monocular gives you roughly 13 degrees. It also reduces light transmission and degrades image quality. Factor in the total system performance, not just the tube specs.
Final Thoughts
Field of view is not a secondary spec. It directly affects how much terrain you can monitor, how fast you can acquire targets, and how effectively you can identify animals at range. The right FOV depends on what you’re hunting, how you’re hunting it, and at what distances you expect to engage.
For most hunters, a moderate FOV — wide enough to scan, narrow enough to identify — is the practical choice. But understanding the tradeoffs lets you make an informed decision based on your specific situation, rather than defaulting to whatever magnification number looks impressive on a product page.
IR Illuminator Not Working With Night Vision? Beam, Battery, Focus and Compatibility Check.
Is your NV not turning on? Battery, Contacts, Mount and Tube-Safe Troubleshooting
Night Vision Collimation and Alignment: Fix Double Vision, Eye Strain and Dual-Tube Setup Issues