
July 15, 2026
PVS-14 Depth Perception: How to Move Safely With Monocular Night Vision
This course explores the importance of depth perception and how to safely move around using monocular night vision (PVS-14).
The Short Version
Loss of depth perception is a normal effect of the PVS-14. Doesn’t necessarily indicate that your tube is broken or that you purchased the wrong one. Monocular night vision gives one eye an intensified image while the other eye is operating with a much different view of the world. That alters the way your brain interprets distance, terrain and movement.
There’s an easy answer, and it’s to slow down, scan purposefully, practice in short sessions, and ensure that your helmet mounted night vision system is stable. Dual tubes can be more comfortable to move, but training is still important. Dual tube system will not compensate for poor footwork, poor concentration, a loose mount or unsafe speed.
If your PVS-14 has been successful in observation and brief locomotion, continue training. Check set-up and technique, but if you’re using the system primarily for long, rough terrain, compare dual-tube systems.
Why does a PVS-14 feel different after you start moving?
One eye sees an intensified image and the other eye does not.
Monocular night vision depth perception is different because you’re no longer providing your brain with the same input from both of your eyes. One eye sees the intensified green or white phosphor image when a helmet is equipped with a PVS-14. The other eye can see light around the object, some details in the periphery, or not much depending on the scene.
When it’s daylight, your brain compares both eyes and the results with shadows, texture, movement, and experience. Single tube night vision takes away that comparison. There are still useful cues, but they aren’t as familiar.
Certain users’ adaptation is rapid. Others require practice and effort. Standing behind a PVS-14 comfortably can feel awkward stepping over brush, crossing a rut, or walking a fence line.
The field of view, focus and brightness all impact terrain reading.
A PVS-14 will provide a smaller field of view compared to vision without a PVS-14. Beginners tend to "look through" the tube and have tunnel vision, seeing the middle of the tube while not noticing a root, rock, ditch or low branch at the edge of the tube.
Focus matters too. Night Vision is not Auto-focus! The ground 2 steps away may appear soft if the objective focus is set at a far tree line. If the entire image is not correct, return to how to focus night vision (diopter objective focus).
Depth cues are also affected by brightness and gain. If the image is too bright there may be no useful contrast. Too much noise in an image and the ground texture can be masked. Manual gain can be used if it is available to tweak the image to be useful rather than glare. NV Guide USA has that for you in the manual gain PVS-14 brightness control guide.
This is because the picture may look great, but your feet may feel shaky.
While image quality is related to movement confidence, it is not synonymous. On a clear tube, a distinct gate, berm, vehicle or tree line can be observed. It still doesn’t inform your feet how deep the rut is or if a shadow is a shallow depression or a hole. The tube is used for vision. How safe you move depends on your technique.
What depth cues remain effective under monocular night vision.
Shadow, texture and contrast of the material.
Contrast is also a crucial factor in night vision depth perception. Texture is provided by grass, gravel, brush, leaves, tire tracks, rocks and range berms. With practice, you will become familiar with the meaning of the textures over time.
A dark line across a trail could be a shallow rut or a tree shadow or the edge of a ditch. Grass can have a different reflectivity when wet versus when it is dry. Low obstacles can be concealed by brush that flatten out under night vision. Slow down, adjust head position and check before weight is placed.
Head Movement and Parallax
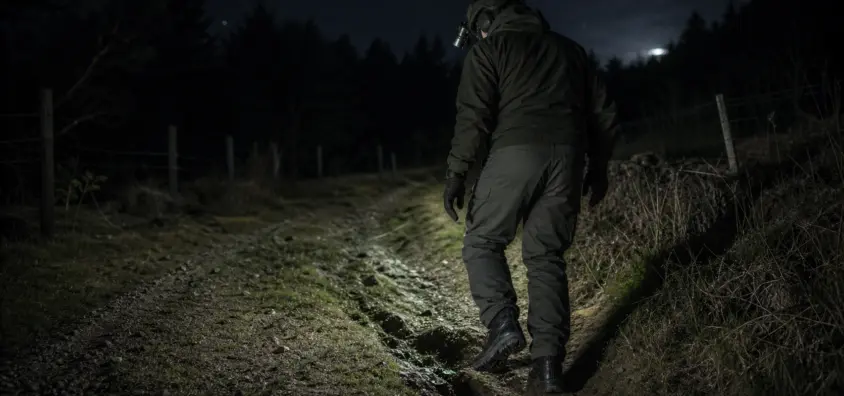
One of the best monocular night vision training habits is small head movement. In the movement of the head, points that are nearer to the observer move more in relation to the background than points that are farther away. This helps distinguish between branches, fence wire, posts, rocks, holes and slopes.
Slow motion to check your observation. When a low branch merges with a line of trees, move your head a couple of inches. When the ground appears flat, but it feels funny, stop and look at the ground from a different angle.
Known Landmarks and Route Memory
When moving with night vision, you’ll be able to move more safely if you know what you’re looking at. Prior to moving, select a point of reference that is still visible under the tube: a fence corner, a tree line, an anchor vehicle, a barn, a range berm, a driveway edge or a safe edge of the range. When familiarizing yourself with the property, walk the path during daylight hours and, in the daylight, keep an eye out for ditches, roots, low branches, and slick spots.
Here are some tips for how to move PVS-14 around:
Use Stop -> Look -> Move
Stop is the basic skill of this discipline, followed by look, and then move. This is especially important with monocular depth perception; it is already pointed out in NV Guide USA’s overall NV movement and scanning guide.
Wait before committing to an action. Search close, medium and long distance. Wait until you have decided the next few moves before you make a move. Then repeat. This is slow and it feels slow. Speed comes later.
Check the near, mid, and far lanes.
A night vision scanning technique is to divide the world into three lanes:
- Near lane: the next 2 to 3 steps where roots, rocks, holes, stairs, wet grass and brush trip you.
- Mid lane: route selection (e.g. fence, ditch, driveway or gate).
- Far lane: larger area with tree lines, vehicles, buildings, berms, animals, persons and safe boundaries.
Sometimes new players choose a lane and forget about the others. Good night vision movement training maintains all three lanes in the scan.
Before loading weight, break down your movements and check the ground.
On uneven ground, shorten your step. Set the foot with intent; sense the surface before transferring the weight. This is important on rocks, stairs, brush, mud, wet grass, gravel and slopes. If possible, avoid stepping on obstacles. Stop to select your footing if you have to cross a ditch or rut.
Never sprint or drive, and never use night vision as daylight.
As a beginner, do not do sprints under monocular night vision. Do not drive with a helmet mounted PVS-14. Don’t take the presence of a bright picture to mean that the area is safe. Night vision does not make night into day, but rather helps to see in the dark.
This is a list of training drills that develop monocular depth confidence.
The 10-Minute Familiar Yard Drill
Begin in a familiar and controlled space- a yard, driveway, private lane or safe range area. Keep it short.
- Don’t move and scan.
- Name three landmarks (fence, car, gate, tree, shed, berm, etc.).
- Take 2-3 steps looking down at the ground.
- Slow walk to a known point.
- Stop, reset and scan again.
- Walk back on the same path.
A careful 10 minutes is more valuable than a wandering hour. Your brain is getting used to monocular night vision depth perception.
Obstacle Recognition Without Speed
Place cones, rocks, low branches, fence posts, equipment cases, shallow depression or boards in a safe location with simple obstacles. It is NOT about running a course. To perceive shape and depth cues without speed. Take a look from further away, then closer and see which obstacles flatten out under the tube.
Helmet Fit and Mount Stability Check
This can give a sense of depth problem when the image bounces. Before pointing fingers at your eyes, look at the helmet, shroud, mount, J-arm, counterweight and retention. The position of the device should be fixed in front of your eyes.
The night vision helmet setup doesn’t have to be complicated but it must be stable. A counterweight will help to minimize strain on the neck and balance is important.
The session will end at the set time.
Don’t go so far as to become frustrated, because it is the first step to developing bad habits. If you experience any of the following issues: headache, fogging lenses, neck pain, unsafe footing or unfamiliar terrain, end the session. There is setup related PVS-14 eye fatigue and some users just need to use it less. If symptoms persist, read how night vision affects your eyes, and make conservative adjustments.
Gear Set Up Issues that Ramp up the Challenge of Seeing Depth.
Loose Helmet, Shroud, Mount, or J-Arm
When the image of what you’re looking at changes with each step you take, your brain must simultaneously address terrain depth and image instability. Then tighten what needs to be tightened and change the parts that are not tight if necessary, and ensure that the device is returned to the same eye position.
The objective lens focusing is not good.
Depth cues are more difficult to read when we have a poor focus. Adjust diopter to proper setting and focus objectives at distance being observed. A lot of people are always seeking focus and forget to be aware when they’re turning knobs. Be purposeful in making adjustments – but don’t forget the scanning.
Too Much Brightness or Gain
Don’t necessarily assume that more is better when it comes to brightness. Bright images may not show any contrast. Manual gain, dim the display to a level that is comfortable and retains detail. Avoid looking directly at a bright light source, focus correctly, and take time to allow your eyes to settle.
There’s no counterweight or the eye was not positioned correctly.
Neck strain has an impact on movement. Helmet pull forward can result in conscious or unconscious tightening of the shoulders and a reduction in the length of the scan. Position the device at eye level where your eye naturally looks and find a balance of the helmet not to fight the equipment.
PVS-14 vs Dual Tubes for Depth Perception
Most often, Dual Tubes enhance the following:
Because dual tubes can often seem a more natural way to move around the PVS-14 vs dual tube depth perception question arises. Many users find that with each eye getting a similar night vision image, there is less visual conflict and greater comfort with longer sessions. To compare even more when it comes to purchasing, check out PVS-14 vs dual-tube night vision.
There are a few things that Dual Tubes won’t fix:
Dual tubes are not a cure for poor training, a loose helmet, or bad terrain. They also don’t produce real "daylight" like three-dimensional perception. There are still some field of view, focus, lighting, and terrain interpretation issues with night vision.
When a PVS-14 Is Still Enough
A PVS-14 still can be a solid response to a lot of civilian users. It can be used for stationary observations, short movements, property checks, lawful hunting support, range use, and beginner training. If you’re primarily using it for observation, with some controlled movement, train, focus and helmet stability before blaming the tube count.
Dual tubes become easier to justify when movement is the primary task.
The dual tubes make sense when movement is the primary task: long walks, scanning, team moves, training in complex environments, or for users who are tired or fatigued. It isn’t like all novices have to avoid the PVS-14. Don’t buy for the sake of buying; buy to meet a use case. The broader night vision section and comparison pages can help when comparing categories.
Common Beginner Mistakes
Looking up too far ahead and ignoring the step that follows.
The distant treeline appears to be of interest. The next is the root that causes you to do a faceplant. Maintain a lane check on the inside lane.
Focusing on the ground and becoming oblivious.
The other mistake is to look at your boots. That will keep the next step safe but it will come at the expense of route awareness.
Adjusting Focus Constantly
It’s a thing of focus, but making constant adjustments is a distraction. Adjust the device appropriately and effect meaningful adjustments with a change in task.
The Tube is the Guy’s Fault before the Set Up and Technique!
A quality tube on a loose helmet still sucks. If the problem is not with the device, test the stability of the helmet, the position of the eyes, diopter, objective focus, brightness and your personal speed.
Now you can move faster when the image looks clear.
Bright and sharp image can make a new user overconfident. The ground still contains holes, slippery patches, height variations and obstructions. Travel at night vision speed, NOT daylight speed.
Final Recommendation
Think of PVS-14 depth perception as first a skill and a set-up issue. Although monocular night vision will alter your brain’s perception of distance, it does not make it impossible to move safely. Most users get better by slowing down, scanning near/mid/far lanes, using small head movement for parallax, training in brief sessions and correcting helmet stability.
Have realistic expectations. The PVS-14 is a great device for many civilian night vision applications, but it requires discipline. The first sessions should be controlled and repeatable.
Use this decision rule: If the PVS-14 can be used for observation and short movement, continue PVS-14 training, and work on the set-up. When your primary need is extended duration travel in rough terrain, if fatigue or visual conflict is a true factor even after training, then make an informed choice between dual-tube systems.
IR Illuminator Not Working With Night Vision? Beam, Battery, Focus and Compatibility Check.
Is your NV not turning on? Battery, Contacts, Mount and Tube-Safe Troubleshooting
Night Vision Collimation and Alignment: Fix Double Vision, Eye Strain and Dual-Tube Setup Issues