
July 9, 2026
Night Vision Helmet Setup for Beginners: Helmet, Mount, J-Arm, Counterweight, and Fit
This article discusses the Night Vision Helmet Setup for Beginners: Helmet, Mount, J-Arm, Counterweight, and Fit.
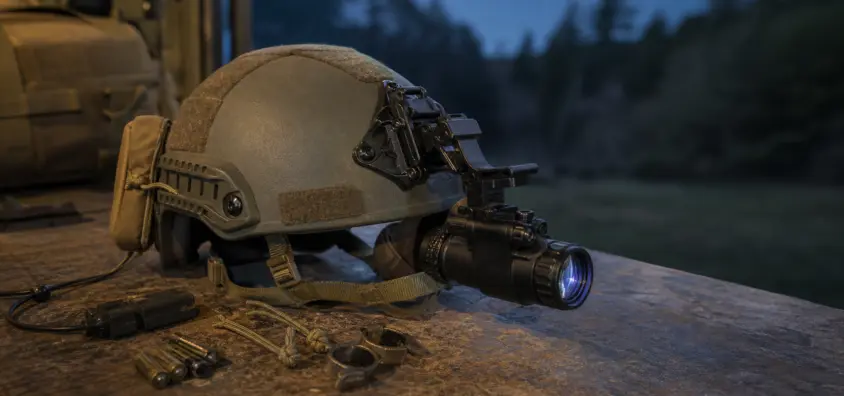
The night vision device is just half the system. The other half is the helmet configuration which holds the tube steady in front of your face without moving, wobbling, sagging, or falling on the floor when you duck under a branch.
I watch many people with no experience buying a PVS-14 for real money and attaching it to a cheap mount on a loose helmet and asking why their images bounce every step. It’s not a tube issue. This is a setup issue.
The best night vision helmet setup doesn’t have to be complicated, but it must be purposeful. Helmet, shroud, mount, J-arm, counterweight, pads, chin strap, retention, batteries and cable routing all play their part. When one is wrong, the entire system is wrong.
If you haven’t yet selected your first device, begin with the night vision beginners guide. If you already have a monocular, but are looking to know more about the bigger picture of accessories, then the night vision accessories guide is the next read. This article deals specifically with the helmet part – how to make it solid enough to be used.
The Short Version
The easiest and most dependable configuration for most new civilian users is:
- A night vision bump helmet of appropriate size made by a good helmet company.
- A front night vision shroud which is secure on your mount.
- Good quality night vision helmet mount – usually dovetail or bayonet mount depending on the size of the arm, and the type of device.
- A compatible J-arm or bridge to attach your monocular to.
- Light rear night vision counterweight or battery pouch (if the helmet is front-heavy).
- A lanyard that can be retained so that the device does not hit the ground when one button is pulled on.
- Fit test in the dark before you trust it outdoors.
Don’t purchase parts haphazardly due to a sale. Interface compatibility matters. The Wilcox G24 mount, Norotos Rhino mount, PVS-14 J-arm and helmet shroud are not universal Lego blocks. Some are dovetail. Some are bayonet. Certain ones need particular adapters. Some combinations are perfect; others fit together in a sloppy, but usable, fashion.
What Does a Night Vision Helmet Setup Really Contain?
The entire NVG helmet ensemble is a chain. Helmet is used to support the shroud. Mount is held in the shroud. The arm is attached to the mount. The arm is used to carry the night vision device. The counterweight and retention ensure that the entire product is balanced and secured.
Helmet or Head Harness
Helmet is the foundation. A bump helmet night vision setup is typically the most sensible starting point to be used for civilian training, property work, range use, and hunting with no need for ballistic protection. A bump helmet provides your shell, pad system, chin strap, accessory rails and front shroud all without the added weight and expense of armor.
A soft head harness or skull crusher can be used, but is not usually very comfortable for prolonged wear. It also allows less structure with accessories, ear protection, cable routing, and counterweight positioning.
Shroud
The shroud is the front interface on the helmet where the mount attaches. This is where you attach your mount. A loose night vision shroud makes all the other parts appear bad. If you do not feel it is secure to the mount or J-arm, check first to see if the shroud is secure to the helmet.
Helmets with an integrated shroud. Others have a shroud that bolts on. Either can work provided it is installed properly and the mount interface is the same. Don’t believe that some random imported shroud will keep a pricey monocular snugly.
Mount
The mount provides flip-up/down and height and fore-aft adjusting capabilities. This is the one area that most people even try to skimp on when setting up, and where the setup can become miserable.
A good PVS-14 helmet mount should not be difficult to lock into the shroud, and should not pull or pull out while walking. The mount will also affect the ease of stowing the device away when it’s not in use.
There are two main styles: Wilcox G24 dovetail mounts, and Norotos Rhino-style bayonet mounts, and there are several interfaces and adapters within both brands and the aftermarket industry. This is a mount known as the Wilcox G24 mount. Norotos Rhino mount is often linked to older bayonet mount set-ups. Those names don’t necessarily imply compatibility with all arms or devices. Please carefully read the specific interface.
J-Arm or Bridge
A night vision J-arm mounts a monocular (typically a PVS-14 type) to a helmet mount. The J-arm is no afterthought if you are building a PVS-14 helmet setup. It manages position, rotation and in certain instances eye-side switching.
Depending on model, a PVS-14 J-arm can feature either a bayonet or dovetail attachment. There are simple arms. Some provide more adjustment, more lockup. If the device does wobble, determine whether a problem is with the shroud, mount, J-arm or the threaded connection on the monocular.
Dual-tube systems or bridged monoculars do not have a single J-arm. It’s another configuration, more weight, more money, more options.
Counterweight and Retention
Helmet is dragged forward by front mounted monocular. There is a rear NVG counterweight to offset that weight. Does not reduce weight of helmet. This helps to make the weight less nose-heavy.
Retention is separate. A night vision lanyard or tether keeps the device in place in the event of a failed mount, arm failure, or when fumbled during adjustment. If it costs more than the helmet, give your night vision a leash.
Bump Helmet vs Ballistic Helmet vs Skull Crusher: What’s the difference?
Different people will have different head platforms that suit their needs. Avoid purchasing a ballistic helmet because you think it is serious, but are not in need of the armor and will end up hating the helmet after 30 minutes.
Bump Helmet
The typical response by many new users is a bump helmet. It offers protection from smaller impacts, provides a solid surface to stand on and is typically lighter than a ballistic helmet. That weight difference counts when it comes to helmet-mounted night vision.
The best night vision bump helmet will include:
- Properly sized shells for heads.
- Adjustable pads.
- Actual Chin strap and Nape retention system.
- A secure shroud.
- Rails – use if ear pro, lights or cable routing is required.
This is the ideal point for most novices starting to learn how to mount night vision on helmet systems without any extra armor weight.
Ballistic Helmet
A ballistic helmet with night vision capabilities provides the added protection, and weight and expense. Different models, constructions and certifications have different ballistic ratings. Avoid taking marketing claims for granted and don’t expect all helmets with shells to be ballistic.
If you purchase one for professional reasons you will want ballistic protection, make sure it’s from a reputable source and check the documentation on the helmet. In low-risk situations such as walking your property or observing wildlife, or learning the basics of night navigation, ballistic helmets may be over-helmet.
Skull Crusher or Soft Head Mount
The old school skull crusher does work… It’s the best I can say.
Soft head mounts are small and less expensive than helmets, but are typically less stable and less comfortable. They might help in a short session or for packing light, but aren’t what I recommend if a beginner wants to learn helmet mounted night vision without the gear getting in their way.
Choosing the Right Mount and Arm
It’s the mount and arm that make the difference in whether the device rests where you need to see it. It becomes costly here where compatibility errors are made.
Dovetail vs Bayonet Interfaces
The two most popular families of interfaces are dovetail and bayonet.
The dovetail mount system offers a more secure, streamlined fit with the appropriate arm. A lot of high quality mono arms and mounts have dovetail interfaces.
Bayonet mounts are used in older military style configurations, many of which are Rhino-style configurations. If parts are good and matched up well, they do just fine, but some users report more play than they would on a tight dovetail.
The key is that you want to purchase the mount and arm as a complete set. Avoid purchasing a dovetail mount and bayonet arm without the correct adapter and knowledge of what you’re doing.
This is why cheap mounts feel expensive later.
There are three ways that a low cost mount can cost you.
One is it can wobble. A bouncing image is distracting and navigation is difficult.
Second, it can become out of tune. When your device slowly starts to droop each time you walk, you’ll continue to reach up to "fix" it.
Third, it will put an expensive tube at risk. I don’t want a monocular on a poor lock up or weak release or sloppy shroud fit.
Where to spend money is where it meets the device – helmet fit, shroud, mount and arm. Fancy patches and rail gadgets can come later.
PVS-14 Specific Setup Notes
The PVS-14 helmet setup is popular, as the PVS-14 pattern is versatile. On some optics it can be used behind the scope, handheld or helmet-mounted if necessary and with proper precautions. Helmet set-up requirements differ from rifle mounting requirements, for the rifle mounting specs consult the night vision rifle mounting guide.
When it comes to helmets, there’s three to look for:
- The J-arm fits snugly into the monocular.
- The arm interface is the same as the mount.
- Optic can be placed in front of your dominant eye without a strange angle of your neck or face.
Do not “just get used to it” if you can’t obtain a centered eyepiece naturally, remount and adjust geometry.
Before mounting the Night Vision to the helmet, it is important to fit the Night Vision to the helmet itself.
First fit, then helmet. Beginners tend to mount the thing and then hunt down all the wobbles with the optic fitted. That conceals the actual issue.
Helmet Size and Pad Adjustment
Fit helmet without night vision. Shake your head gently. Look left, right, up, down. The helmet should not slide across the head.
Pads should make even contact. If you experience one point of pressure and have an empty area, change the pad arrangement. If the helmet is too loose it will wobble with the night vision. Too small a helmet will cause you to have a headache before it is useful.
Chin Strap and Retention
Chin Straps are not for show. Secure it so the helmet will not move when the monocular is folded down. The nape strap should not allow the helmet to roll forward when under the front load.
A good fit of a helmet for night vision will not be painful, but it will be secure. The helmet should not be fitted so low on the forehead that talking, breathing, and scanning is hindered.
Ear Pro and Eye Pro Clearance
Try your ear protection (if you have it) now. Helmet rails, pads, straps and headset bands can conflict with one another. Eye protection can also affect the position of the eyepiece.
Set up the helmet as it will be used. A perfect fit in the garage without ear pro does not mean anything if using electronic muffs at the range.
Setting Eye Relief and Alignment
With the helmet on place the night vision and adjust the optic to eye level.
Set Height First
Lower the device and adjust the vertical level to place the picture in a natural position in front of the eye. There should be no need to raise the eyebrows, look up into the eye or smash the eyelid into the face.
Set Fore-Aft Distance
Adjust the optic forward or backward to see everything comfortably. Too near and it will feel cramped and impedes eye pro. If the distance is too far, it may limit the effective display area and give the impression of a disconnection.
Firstly, set Tilt & Rotation.
Level the image. A ‘canted’ monocular will make your brain work harder. That also makes for a quick addition to fatigue, particularly when navigating rough terrain.
Make small changes. Wait for a few minutes after every setting to wear it. Ten seconds may feel great but after a walk feel bad.
Useful when you need it, counterweight.
If the front load of the helmet tends to want to tip forward or your neck begins to oppose the load, you need a counterweight.
Why Front-Heavy Helmets Cause Fatigue
There is a monocular hanging off the front to provide leverage. Even the small weight is harder to bear as it is placed away from the head. This leverage results in night vision neck fatigue, particularly when conducting lengthy scans or slow walking.
If you have to tighten the chin strap to make the helmet fit so it will not move, the balance is incorrect.
Batteries vs Dead Weight
There are two purposes for a rear battery pack: power management and counterbalance. A little counterweight pouch can help if your device doesn’t have an external power source.
Start light. Just add the rear weight to balance if necessary. Bigger isn’t necessarily better. Even a boat anchor-like helmet is heavy.
Helmet should not be overloaded.
Sometimes, beginners put everything on the camera: counterweight, extra batteries, strobe, admin light, ear pro, camera, cable guides, patches and so on. Then they ask themselves, "Why does my neck hurt?"
Until you’re on the field, make the helmet as simple as possible. Only use night vision helmet accessories for a genuine solution.
The management of cable, battery, and retention devices.
The purest helmet configurations are the ones that don’t look interesting. It is a good compliment.
Do not have cables over snags.
When using an external battery pack, cable them snugly into the helmet. Don’t leave any loose loops that can snag brush, sling material, pack straps, or inside of vehicles.
Use hook and loop, cable clips or elastic keepers. Just enough room for flipping up and down, but not too much to get caught.
Keep your lanyard attached to the body.
Install a night vision lanyard on the device/arm to the helmet. Shouldn’t block movement, but should snag the device if it’s let go.
This is a very low cost insurance. I’d like to unravel a tether more that to see a monocular hitting gravel.
Battery Discipline
Be familiar with the type of battery that is used, how to change it and what the actual life expectancy is in your circumstances. Always have spares in the same place. Store batteries at suitable times and locations to prevent leaking. Check out the night vision storage guide for transport and storage habits.
Before using the setup, have the first night fit test.
Do not make your first ‘true use’ the first time wearing the helmet in darkness. Try it out in a safe place, near to home.
Walk, Stop, Kneel, and Scan
Walk slowly. Stop. Turn your head. Kneel. Stand back up. Search under trees and open areas. Helmet should remain secure in normal motion.
Check for Wobble
If bouncing, pinpoint the origin of the image. Keep the helmet in the same position and shake the device slightly. Test each of the following individually: shroud, mount, arm, and monocular.
It is not normal for vision to be blurry at night; don’t accept this as normal based on your newness to night vision.
After 20-30 minutes, check for fatigue.
Put on the complete gear for a minimum of 20-30 minutes. That’s where shoddy balance, poor padding and over-tight straps begin to reveal themselves.
If your neck is fatigued after 30 minutes, make the adjustments necessary before you go on a longer session. Another cause of eye fatigue is poor focus, bad alignment and constant strain, this is covered in greater detail in the night vision eye fatigue guide.
Practice Flip-Up / Flip-Down
Practice the up and down motion with your regular gloves, eye pro and ear pro. Ensure that the mount is locked in either position. If the device falls from where it is or doesn’t lock, address this issue prior to exiting.
There are common mistakes people make when setting up their night vision helmets.
The same errors will repeat themselves:
- Not checking size charts and return policy before purchasing a helmet.
- Mixing dovetail and bayonet parts, but not understanding the interface.
- Loose shroud and fault J-arm.
- Running no retention lanyard.
- Accessorizing the helmet too much prior to solving fit.
- Using the monocular too low and looking up.
- Not considering eye pro and ear pro clearance until the Range Day.
- By using a mount name, it is compatible with all devices.
- Purchase a Ballistic Helmet for everyday use and come to hate the weight!
- Not conducting the first night fit test.
The majority of these can be prevented. Don’t rush into ordering parts.
Practical Buy Order
In an ideal, "from scratch" building of a beginner’s helmet mounted night vision system, I would buy the following items:
- Night vision device after reading the specs that matter. There, a night vision specs guide helps.
- Correctly sized bump helmet/plattform of head.
- If a helmet does not have a compatible shroud, one must be added.
- Quality mount for the interface desired.
- J-arm or bridge that is compatible.
- Retention lanyard.
- Small counterweight or battery pouch (if necessary for balance).
- Extra batteries, lens caps, cleaning kit and storage case.
- IR illuminator – only if it is necessary to have active illumination for your use case.
An IR illuminator can be helpful, but it isn’t a substitute for a good helmet rig, on that last point. If you don’t know what type of illuminator category you would need, check out the IR illuminator guide. Never put lasers, strobes or active IR gear down willy-nilly, without knowledge of your equipment, surroundings and rules.
Helmet Setup Troubleshooting
When walking, if the image is bouncing, check the helmet fit, then the shroud, then the mount, then the J-arm. Start working from the helmet and work outwards.
If the helmet slips forward, try tightening and adjusting the nape retention and try a light counterweight. The balance or size is incorrect if the chin strap needs to be tightened until it hurts.
If the optic won’t line up with your eye, check the mount height range and arm geometry. Some combinations just don’t place the device in the position you desire.
If the device feels heavy after a few minutes, take off any unnecessary accessories. Then test balance. Avoid tackling comfort problems by just adding more weight at the back.
Do not use the mount until the problem has been found if the mount will not lock securely. Test shroud interface, arm interface, mount wear and incompatible parts.
Determine if the view is poor due to optical issues or helmet issues. Focus, diopter, tube quality, ambient light and IR conditions all are important. Even with a great fit, a poor focus can make a tube bad, and even with a bad fit, a good tube can’t make up for poor focus.
Final Field Checklist
Before you do your first serious night session, go over this checklist:
- Helmet fits properly without device attached.
- Pads are comfortable after 20-30 minutes.
- No forward roll with chin strap and nape retention.
- The Shroud must be snug to the helmet.
- Mount fits into shroud.
- J-arm or bridge matches the mount interface.
- Monocular fits snugly on the arm.
- Eye relief, height, tilt and rotation are established.
- Counterweight for better balance without overloading the helmet.
- Retention lanyard is attached.
- Cables are kept tight and away from snag points.
- Batteries are new, spares are packaged and storage batteries are stored properly.
- The flip-up and flip down stay in place.
- Ear pro and eye pro fit with the helmet.
- You have walked, stopped, kneeled, scanned and checked wobble in a controlled area.
Wearing a night vision helmet setup isn’t about looking square in photographs. It’s about maintaining the stability of the image, safeguarding the device, and sustaining the use of the device by keeping your neck functioning.
Assemble the system from helmet to the outside. Match the interfaces. Before the first night test fit. Drown out the marketing mumbo-jumbo—until it gets the fundamentals right.
IR Illuminator Not Working With Night Vision? Beam, Battery, Focus and Compatibility Check.
Is your NV not turning on? Battery, Contacts, Mount and Tube-Safe Troubleshooting
Night Vision Collimation and Alignment: Fix Double Vision, Eye Strain and Dual-Tube Setup Issues