
June 18, 2026
Best Thermal Targets for Zeroing a Scope: DIY Options, Range Setup, and Mistakes to Avoid
If the regular paper bullseye is invisible to the thermal scope, it’s virtually worthless. Obviously, after the frustrating hour at the range, but many hunters are surprised by this on their first thermal rifle scope sight! Thermal optics are oblivious to black ink, orange stickers and a neat printed grid. They require a contrast in temperature.
Zeroing is not necessarily something hot. It is a small, repeatable, thermal/visible aiming point, mounted on a safe, stable backer at the distance you really need to confirm. If you do this wrong, you can waste ammunition, adjust the scope, and ultimately tell yourself that the scope has a zero issue when in fact the issue is with the target.
Below is my target setup that I use and recommend for a clean zero before a hunt for hogs or coyotes.
The Short Version
Four things are required for a good thermal target for zeroing:
- Clearly discernible temperature difference with background temperature
- An accurate aiming point to focus the reticle on with each shot
- Good stability, maintain visibility throughout the entire group
- A safe backer and impact area in compliance with the normal live-firing rules.
Large heat sources are easy to see, but can be bad aiming points. A playing card-sized hand warmer can look great in the scope but will only provide you with a diffuse center, rather than a repeatable spot. That’s important when you’re attempting to confirm a thermal scope point of impact at 100 yards.
Field rule: If you don’t have the ability to aim at the same small spot with every shot, you’re not testing the rifle, the scope or the ammunition. You are checking out your target.
Why Regular Paper Targets Fail Through Thermal Scopes
Thermal Scopes See Temperature Contrast, Not Printed Ink
A thermal scope creates a picture based on infrared radiation and temperature difference. It is not reading a paper target, like your eyes or a daylight riflescope do. If the surface of the paper is one uniform temperature, then a black printed bullseye on a white paper may appear to be the same as the rest of the paper.
This is why it is necessary that the proper thermal scope target is hot or cold. You are providing an optic with something to separate from the backer.
Detection Is Not the Same as a Precise Aiming Point
Seeing the target is just the beginning. Zeroing demands precision. The heat signature of a coyote is easily visible, and no one would want to use the entire animal as a fine zero reference. The same applies for a homemade thermal target.
You desire a thermal-visible aiming point with a centre point. If the picture appears fuzzy and oval, it might be better to try pointing at the center of the image on one shot, the top of the heat signature the next, and the left side of the heat signature the third. That results in group spread similar to shooter error, ammunition variation, or zero shift on a thermal scope.
Why Big Heat Sources Can Create Bad Groups
Big heat blobs conceal little aiming errors. You won’t necessarily see it at 50 yards. Those small aiming errors can result in a wider than desired group at 100 yards.
This is especially important if you are using a digital one-shot zero/freeze zero workflow. The first shot provides the scope with a reference point for where it is striking but your point of aim needs to be consistent. A poor aiming reference will generate a poor aiming correction.
What Makes a Good Thermal Zeroing Target
Small Enough to Center Consistently
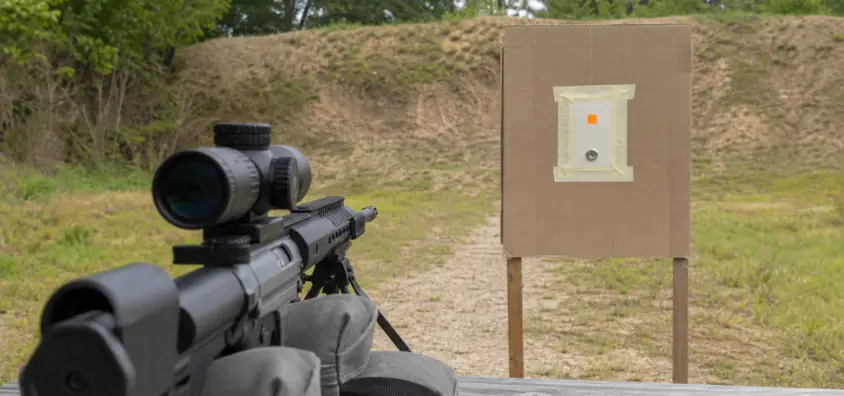
Generally with most hunting rifles I wish to see the visible hot or cold spot is less than the size of the group I’m looking to put down. A thermal-visible point that is 1-inch to 2-inch in diameter is typically more helpful than a 5-inch warm spot at 100 yards. If the heat source is bigger, use a physical reference like a small center dot, washer, cross mark or edge guide to consistently hold.
Hot or Cold Enough to Stand Out
A hand warmer, heated washer, foil tape or a cold pack will all help, but not in all circumstances. The scope could detect a different result when the sun is bright, there is a bit of wind, and the cardboard is wet, or when the dirt berms are warm, the night is humid, and there is thermal crossover.
Before shooting, peer through the scope and ask yourself this one question: Can I get the center of the reticle on this very spot without guessing?
Stable Long Enough for a Group
Zeroing takes time. Loading, settling behind the rifle, running NUC, shooting, inspecting and shooting again may be necessary. Mid-group target drift 1/2 way off leads to a change in point of aim.
Hand warmers typically should provide a good margin for error. Ice based targets can be abrupt and have a quick fade. Foil tape can shift according to viewing angle and sky reflect. Test the target first before making the assumption it is good for the entire group.
Safe, Cheap, and Easy to Replace
Don’t encourage unsafe range behavior if it’s a target for live fire. Never use open flame, homemade electrical heaters, broken batteries, aerosol cans or anything that your range would not handle. Cardboard, paper, foil tape, disposable hand warmers, small pieces of metal or commercial thermal targets are much better choices.
Visible at Your Actual Zero Distance
What may seem like an ideal target at 25 yards may be a bit too large or too generic at 100 yards. Always check at the distance that you will use. If you do have a hunting zero of 100 yards, try it at 25 or 50 yards, and zero the thermal scope at 100 yards using the same profile, ammunition and rifle setup you will be hunting with.
The Most Effective DIY Thermal Target Solutions
Hand Warmer on Cardboard or Paper
Most hunters use a hand warmer thermal target. Place a disposable hand warmer on cardboard/piece of paper and allow to heat up prior to starting.
The issue is size. A hand warmer that’s completely full is generally too large to fine zero. Better options:
- Wrap cardboard over a portion of it to leave smaller window showing
- Utilize edge or corner as aiming reference
- Mark the hot spot with a small washer/marker (center reference)
- Use it for close in bore confirmation and then change to a smaller point at 100 yards
A thermal scope hand warmer target is great for obtaining the visible contrast in a fast manner. Only don’t consider the whole warm rectangle a bullseye.
Foil Tape or Reflective Tape
A foil tape thermal target can be useful—though not in the way shooters may think. Foil doesn’t magically heat up! It can be detectable because it is reflecting a different thermal background such as the sky or a cooler area around it.
This renders a foil tape which is inexpensive, light and useful particularly on cardboard. It also renders it condition dependent. Adjust the angle, background, sun exposure, or humidity and the contrast may diminish. I am using foil tape for back-up and not as the only target in the range bag.
Ideally, a small square or cross of foil tape should be used and checked out through the scope prior to firing.
Heated Screw, Washer, or Small Metal Point
If one prepares a heated thermal target safely, a small metal point can serve as a precise target. A washer, screw head or small metal disk provides a shape, and metal conducts or retains heat in various ways than cardboard.
The safest way to do this is to warm the metal before it is set on the backer, then check it to see that it is secure and that there are no items on the target line that may be flammable or unsafe. Never use an open flame at the firing line and adhere to range regulations. The idea here is not to create a complex device. It is one to make a small, stable aiming reference.
Hot Water Bottle or Balloon
A balloon or small bottle of warm water could be easily visible. It is helpful for boresighting, close range checks and to know if the scope is generally aligned.
Too large for fine zeroing, unless a precise reference is added. At 25 yards, if you are using a warm bottle, draw a point on the backer and be honest: Can you maintain the same point on the backer for every shot?
Cold Pack or Ice-Based Target
When the background is warm, a cold thermal target can be as good or as bad as a hot target. Thin cardboard behind a cold pack or ice might provide a dark, distinct aiming point in White Hot or bright aiming point in Black Hot, depending on palette.
The drawbacks are limited duration, condensation and contrast changes. In warm weather, cold targets are particularly useful and require more attention between groups.
Commercial Thermal Targets
If zero thermals frequently, if you want to help other shooters at the range or if you want a cleaner repeatable setup, consider commercial thermal targets. The good thing is the convenience and consistency. The downside is the limited availability and cost.
I wouldn’t say to a hunter that he must have a commercial target. An accurate self-made thermo target can be effective. However, when troubleshooting a high-priced optic, a specially-designed thermal scope zeroing target can eliminate one more variable.
Target Size: What Is the Appropriate Size for the Thermal Aiming Point?
25 Yards vs 50 Yards vs 100 Yards
A larger thermal target is OK at 25 yards, as it’s typically to get on paper and not waste rounds. I would prefer a smaller, cleaner target at a distance of 50 yards. The target should be accurate enough to determine the actual hunting zero at 100 yards.
The practical range flow is as follows:
- Set up at 25 yards from a highly visible target.
- When the rifle is near move to 50 yards.
- Make sure at 100 yards the aiming point is smaller and repeatable.
- Take a last group shot before taking notes or equipment blame.
The Difference Between a 1-Inch Heat Blob and a 1-Inch Aiming Point
There is a difference between a 1" heat source and a sharp 1" aiming point. Thermal images are blooming, smearing, focus dependent, palette dependent, gain dependent and background dependent. If the edges of the heat source are fuzzy, the actual hold point could be larger than what is seen.
Employ the smallest target possible on which you can focus reliably without losing it between shots.
Use the Smallest Target You Can Center Reliably
That is the actual standard. Not the smallest possible target! Not the brightest target that could be set. The smallest target you are able to repeatedly center on under your range conditions.
How to Set Up a Thermal Target for Zero Confirmation
Start at 25 or 50 Yards Before Moving to 100
If it is a new mount on the rifle, begin close. This is particularly true following a change in mounts, rings, ammo, suppressor setup or zeroing profiles. Close target is the economy use of ammunition and controlled first corrections.
For a complete workflow, check out NV Guide USA’s guide: how to zero a thermal rifle scope.
Always Use a Stable Backer and Safe Impact Area
Do not use a target stand or backer which wobbles excessively in the wind. Ensure that the backstop is safe and that no part of the firing line is obstructed and that the muzzle is never pointed at a danger through an adjustment. Thermal zeroing can cause shooters to look at menus and screens. Don’t let the optic take the place of basic firearms safety practices.
Allow the Scope to Warm Up, and Then Run NUC Prior to Shooting
Allow optic to settle. A lot of thermal scopes also utilize an NUC (non-uniformity correction) to refresh the image and minimize sensor noise. If the view changes after a NUC cycle, refocus and confirm target prior to firing group. There is a practical explainer on thermal NUC explained by NV Guide USA.
Set Up the Target Before Adjusting Zero
Focus isn’t about frippery. A marginally soft thermal image can cause a good target to appear fuzzy and can alter the perception of where the middle is. Do not touch windage, elevation or digital zero controls until the target is focused at the actual distance. For those who need a refresher, read how to focus a thermal scope.
Shoot Before Moving the Reticle
Don’t adjust from one questionable shot unless you’re merely striving to get on paper. For final confirmation take a group shot from a stable rest. Then move the reticle or adjust the zero to the center of the group NOT the worst shot.
For those who have a scope with a freeze frame or one-shot zero or multiple zeroing profiles follow the instructions for your specific scope. Not all thermal scopes have the same menu path or click value.
Common Thermal Target Mistakes That Look Like Scope Problems
Using a Heat Source That Is Too Large
If the target has a large heat source, this will make the target easy to detect and hard to center. This is the most common error I observe when I’m teaching people how to sight in a thermal scope.
Cooling or Warming the Target Between Shots
Your point of aim could differ between shot #1 and shot #3 if the target moves between shots. Maintain constant target contrast within the group or change the target prior to achieving zero.
Do Not Aim With Different Edges of the Same Heat Signature
Edges are always inviting as they can appear sharper than the central part. The issue is that various edges create various holds. Select one repeatable reference and use throughout the group.
Zoom, Palette, or Focus Change Mid-Group
The image of the target can be altered by using a digital zoom, palette, brightness and contrast, gain, and focus. Prior to the group, set the thermal scope settings and let them stand until the group is assembled. See NV Guide USA’s thermal scope settings explained: gain, contrast, brightness, sharpness, and zeroing profiles for more detail.
Blaming Zero Shift Before Checking the Target
In reality thermal scope zero shift occurs because of mount issues, temperature, loose hardware, changing ammunition, changing suppressors, profile errors, or optical issues. However, a bad target can appear just as a shifting zero. Before diagnosing thermal scope losing zero, make sure your target, mount, focus, ammunition and profile are controlled.
Using the Best Target Method for the Situation
Quick Pre-Hunt Zero Check
Use small commercial thermal target or hand warmer with small exposed window. Keep it simple. The idea is not to re-create the entire zero; it’s to ensure the rifle still points at what you want it to.
Check current state, species, public-land, private-land and equipment rules also before night hunting. NV Guide USA maintains a state-by-state resource for night vision hunting laws by state.
Full Range-Day Zeroing Session
Take multiple target approaches. Hand warmers, foil tape, cardboard, tape, a marker, spare backers, and a notebook are my favorites. Begin large, locate the target quickly and then switch to a smaller zeroing thermal scope target for confirmation.
Cold Weather Zero Confirmation
Hand warmers typically look great in the cold season, but batteries, gloves and rigid mounts can be a problem during the session. Allow the optic to settle, take temperature readings, and verify that the optic is not blooming too large.
Thermal Crossover Conditions or Warm Humid Night Conditions
Warm and moist weather can decrease contrast. Backgrounds and targets may approach equal apparent temperature during thermal crossover conditions. In such environments, have both hot and reflective or cold targets.
AR-15 Thermal Scope vs Bolt Rifle Setup
Whether you are using an AR-15 or bolt rifle, the target is not aware of your weapon. Semi auto platforms allow for the inclusion of mount, rail, suppressor and ammunition variables. Although bolt rifles are a simpler mechanical system, they too require a stable rest and proper torque as per the mount manufacturer’s instructions. If you have recently changed the optic or the base, re-read how to mount a thermal scope.
How to Record Your Thermal Zero Target Setup
Distance, Target Type, Temperature, Ammo, Suppressor, and Profile
Record what is important:
- Distance: 25, 50, 100 yards, or your chosen zero
- Target type: hand warmer, foil tape, cold pack, commercial target or heated metal
- Weather: temperature, wind, sun, humidity
- Rifle and ammunition
- Suppressor on or off
- Zeroing profile used in the scope
- Palette and magnification
- Final point of impact
In these notes, there is nothing to be interesting, unless some change occurs. If so, they are worth it.
Take Pictures of the Target and Group
At the end of the group take a picture of the physical target. If your scope can video or take snapshots, then save the thermal image as well. Bullet holes are clearly visible in a normal photo. A thermal image reveals what you had in your sights.
Notes for Future Zero-Shift Troubleshooting
It helps you discern whether the rifle is printing differently next month or is it the effect of a different target, different ammunition, different suppressor, or different environmental condition.
Quick Checklist: Thermal Target Setup Before You Fire
- Rifle is well secured, and pointed in a safe direction
- Backstop and impact area are safe
- Mount and rings are checked per the manual
- Correct zeroing profile is selected
- Scope has warmed up
- NUC is complete
- Target is visible through the scope
- Aiming point is small and repeatable
- The lens is focused at the distance where the target is located
- Palette and zoom are selected prior to the group
- Ammunition and suppressor setup are appropriate for your purpose
- Group plan is in place prior to the first shot
FAQ
Is It Possible to Zero a Thermal Scope on Regular Paper?
Usually not well. While standard paper will show the bullet hole after firing, the print bullseye will not be a helpful sight picture when viewed in a thermal scope. Use a thermal point of aim like a hand warmer, foil tape, cold pack, a heated small point of metal or a commercial thermal point of aim.
Do Hand Warmers Work Well to Zero a Thermal Scope?
Yes, hand warmers are one of the simplest handmade thermal targets out there. The secret is to control size. A full hand warmer may be too big to be precise; use a small, exposed section, or an edge or a center reference.
Is Foil Tape a Good Thermal Target?
Foil tape works, but it is dependent on angle, background, sunlight and weather. It frequently reflects a different apparent temperature back than the target backer. Always check it in the scope before shooting.
What Size Target at 100 Yards?
Center on the smallest thermal-visible point possible. However, for many hunting rifles, it’s a decent starting point to have a 1 to 2 inch visible reference at 100 yards, but quality of the image, scope resolution, magnification and shooter stability are all important.
Can a Bad Target Look Like Thermal Scope Zero Shift?
Yes. Your group can move or spread out if the heat source is too large, difficult to center, or unstable. Check the target, then determine it is not the optic, mount, ammunition or profile.
When Zeroing, Should It Be Done Using White Hot or Black Hot?
Choose the palette with the clearest and repeatable aiming point. Warm targets might be easier in White Hot, whereas Black Hot might make the target easier to center. Never change palettes during the group.
Final Field Rule
Don’t blame the optic, control the simple variables: target, focus, NUC, profile, mount, ammunition, suppressor state, rest, and shooter input. A precise, thermal-visible target is a low cost insurance. It lets you be sure you have zeroed in correctly and gives you peace of mind before going to hunt at night and not chasing a problem that was never there!
IR Illuminator Not Working With Night Vision? Beam, Battery, Focus and Compatibility Check.
Is your NV not turning on? Battery, Contacts, Mount and Tube-Safe Troubleshooting
Night Vision Collimation and Alignment: Fix Double Vision, Eye Strain and Dual-Tube Setup Issues