
June 12, 2026
How to Focus Night Vision: Diopter, Objective Focus, and Blurry Image Fixes
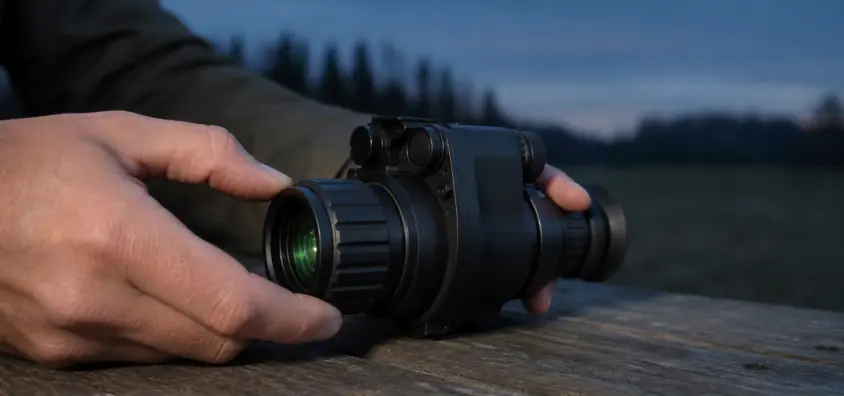
This tutorial will show you how to adjust your night vision device for diopter, objective focus, and a fuzzy image.
Most complaints of blurry night vision are not due to tube failure. They are setup problems. I’ve seen new users blame the device, the tube grade, the helmet mount, and even the moon phase before they even look at the two rings that actually control the image: the eyepiece diopter and the objective focus.
Analog night vision is not a cell phone camera. It does not autofocus. With a PVS-14-style monocular, you can obtain a sharp image only when your eye, eyepiece, objective lens, and target distance are working together. If one of these is wrong, the image can appear soft even when the device is in top condition.
This tutorial covers the how, why, and what to do in a practical order to focus night vision, how diopter adjustment differs from objective focus, and how to troubleshoot blurry night vision before you start spending money upgrading something you may not need.
Why Night Vision Looks Blurry Even When Nothing Is Broken
There are various reasons why a night vision monocular may look blurry, and it does not mean that the tube is bad. The common causes are simple:
- The eyepiece diopter does not correspond to your eye.
- The objective focus is not adjusted to the proper distance.
- The device is mounted too high, low, near, or far on the helmet.
- The objective lens or eyepiece is dirty, fogged, or wet.
- Scintillation is seen in weak ambient light and is not optical blur.
- Analog night vision focus is expected to behave like digital or thermal imaging.
The last point is important. Analog image-intensified night vision is an optical system wrapped around a tube. It intensifies light, but it still has depth-of-field restrictions. Concentrate on your hand and trees in the distance may become soft. Look at distance and your map, sling, gate latch, or radio controls may become blurry. That is normal.
The NV Guide USA night vision beginners guide discusses the difference between analog, digital, and thermal devices in the broader context of the first-time buyer. This article remains within the analog PVS-14-style workflow since this is where the majority of diopter and objective focus confusion occurs.
Diopter vs Objective Focus: The Difference That Confuses Beginners
The easiest way to make a good monocular look bad is to randomly spin both focus rings. This is what beginners do all the time. They see a soft image, grab the front ring, grab the back ring, and forget which ring made which adjustment.
A better way is to split the two jobs.
What the Diopter Actually Adjusts
The diopter adjustment is the one on the eyepiece side. On a PVS-14-style monocular it is the ring nearest to your eye. It does not focus the surrounding environment. It makes the output image match your eyesight.
Consider the diopter as the apparatus asking, "How should this user’s eye see the image in the tube?" If the night vision eyepiece focus is not correct for your eye, the entire view may be uncomfortable. The scene may never be as sharp as you wish, even once you have twisted the objective focus ring.
This is why you first set the diopter. When the eyepiece is in alignment with the eye, the objective focus ring can be used to set the distance to the real world.
What Objective Focus Actually Adjusts
The objective focus is the front lens adjustment. It concentrates the external image on the tube. People refer to PVS-14 focus adjustment, night vision objective focus, or the night vision focus ring when they are referring to this front ring.
The objective ring determines the near, intermediate, or distant focus of the device. If you focus on a tree line, the wrench in your hand will likely blur. Now concentrate on the wrench in your hand and watch the tree line become blurred. There is nothing wrong with this. That is optical depth of field.
The term night vision infinity focus is used by some users to mean making the device focus on more distant objects without obvious blurring. This can be helpful when scanning or walking and for outdoor jobs, but it does not mean it is a magic setting for everything. When maps need to be read or near work is needed, such as checking gear close to the chest, refocusing is typically needed or an accessory lens setup can be used.
Why Turning the Wrong Ring Makes the Image Worse
If the objective is incorrect and a diopter adjustment is made, then the wrong problem is being corrected. The image will briefly appear sharper, but the eyepiece is now mismatched to your eye. When you adjust the distance to the target, you are thrown off again.
Adjusting the objective to get a clear image can turn into too much work if the diopter is out of alignment. The center may sharpen and then soften. Your eye strains. You begin to suspect that the tube is faulty. Typically, the problem can be corrected simply by resetting the device in the proper sequence.
Step-by-Step: How to Focus a Night Vision Monocular
This process is applicable to a common analog monocular such as a PVS-14-style device. The sequence is the same as always, but always follow your manual: safe lighting, diopter first, objective second, helmet position last.
Step 1 – Start Safely in Low Light
Avoid testing analog night vision in the daytime. Never direct it toward the sun, car headlights, bright lights, lasers, or other intense light sources. Use the protective objective cap or manufacturer-recommended daylight cap as needed for the device for a controlled setup indoors or near dusk.
The setup environment is safe, controlled, and boring. You need a certain amount of low light so that you can view the target without overexerting the tube. A dark hallway that does not have much spill light, a shaded room, or an outdoor area after the sun sets can be used. The idea is to focus the device, not to see how much bright light the device can handle.
If you are unfamiliar with taking care of your tubes, read our NV Guide USA blog on phosphor burn and night vision tube damage before you go to town with your experimentation.
Step 2 – Set the Diopter First
First ensure that the objective focus is at neutral distance or that the objective is covered by the correct pinhole-type cap for safe setup. Next, view through the eyepiece and set the diopter so that the image on the intensifier screen or the grain pattern you can see is as sharp as possible to your eyes.
Do not use the sharpness of a tree or wall in the background to determine the diopter. That is the objective’s job. The image plane should be comfortable for your eye. Once set, do not touch it until it is used by another user or your vision setup changes.
Set the diopter the same way the monocular will be used in the field when using prescription glasses or contacts. A diopter setting without glasses may not be correct when glasses are put back on.
Step 3 – Set Objective Focus for the Actual Distance to the Target
Now adjust the front objective focus ring for the scene of interest. When scanning a field, look out in the distance. When traversing brush, look at a closer range where hazards, brush, and ground features are of concern. Checking equipment? Focus close and accept that distance will soften.
PVS-14: diopter for your eye, objective for the target. This is the essence of how to focus a PVS-14. Avoid changing the diopter for every change of target distance.
Field practice is to dial in a general distance and make small adjustments to the front ring only when the job changes. Randomly spinning the ring in and out is time-consuming and can cause loss of situational awareness.
Step 4 – Recheck Helmet Position and Eye Relief
Night vision helmet mount focus is more than just the lens. The image can be soft or tiring if the monocular is set too far from the eye, too close, too high, or slightly off-center. Sometimes a shadow effect, vignetting, or a perspective that is sharp only if you tilt your head may be seen.
When the diopter and objective have been adjusted, the mount should be adjusted to make the eyepiece level with the eye. It should not be necessary to cran the device, raise the brow or press the face into the device. If this is the case, then the mount geometry is wrong.
On the hardware side, there’s a practical guide to the importance of the mount and arm in Night Vision Accessories and Mounts: What They Are, and Why They Matter.
The most common type of blurry night vision problems and what they are likely to indicate.
One symptom is not blurry night vision. The blurring of the pattern provides you with a direction in which to begin.
The middle is hard, the ends are soft.
In many optical systems, a certain amount of edge softness is to be expected. Avoid judging the whole device based on viewing the very edge of the image. The key to focus usability is the center.
If the center is clear but the sides are a little soft, it may simply be a normal lens effect. If the edges are quite smeared, or much worse on one side than the other, check to see if your eye is behind the eyepiece and that the eyepiece is placed squarely. If the problem persists in controlled conditions, it might be worth examining.
It is important to read the article from NV Guide USA about night vision field of view, so that the image can be realistic.
Objects that are close are sharp but objects that are far away are fuzzy.
The objective is probably focused too close. This is typical after map reading, sling check, buckle adjustment or gear handling. This is what you told it to do: it concentrated on close up.
Shift the objective focus back to the distance required. If the whole image seems to be incorrect even after proper setting of the front objective, do not change the diopter.
Distance Is Sharp but Hands / Maps / Gear Are Blurry
This is normal analog night vision focus behavior. A distance-focused monocular will not sharpen all nearby objects. When working close to the object, it is necessary to refocus the objective, use a close-focus accessory if appropriate, or use task lighting that is appropriate for the situation and equipment.
Do not presume the device is broken because your hands are blurring but the line of trees is fine. This is exactly what should take place when the device is focused far.
One Eye Feels Strained or the Image Never Looks Comfortable
Always begin with the diopter. Next, inspect eye relief, helmet position, and whether you are attempting to get both eyes to read vastly different imagery for too long.
Some new users also over-squint or over-stare through the tube. Relax your face. If possible, use both eyes. If you find that the image is only usable if you twist your head in a very unnatural position, the problem is the mount alignment and not the optics.
The Image Is Grainy, Not Blurry
There is quite a difference between night vision grain and blur. Grain, sparkle, or scintillation typically indicates that the tube is operating under limited illumination or under less than optimum signal-to-noise conditions. The outlines can still be in focus, but the image appears noisy.
Blur means edges are not clearly defined. Grain means the image is noisy. Even in very dark conditions, an image can be properly focused and still be grainy. The situation can be alleviated by better ambient light, an appropriate IR illuminator, and/or a better-performing tube, but refocusing will not correct actual low-light noise.
For spec purposes, NV Guide USA has a guide on how to read night vision specs: the numbers that actually matter that explains the importance of SNR and FOM, along with tube quality, in low-light situations. The IR illuminator guide also clarifies when it is best to add light.
Focus Tips for Hunting, Scanning, and Helmet-Mounted Movement
The tips below can help you focus when hunting, scanning, and when you are wearing a helmet.
Focus setting should be appropriate to the task. One size does not fit all.
Outdoor / Field Focus
If you are in open terrain, the goal will be the distance at which you must be able to see and understand movement. If you are looking at a tree line, trail, or field edge, do not obsess about a small object near you.
Know the difference between detection, recognition, and identification. There are limits in a focused image due to the performance of the tubes, lighting, weather, and target contrast. The detection range limits are detailed in more depth in NV Guide USA’s night vision detection range guide.
Navigation and Movement
A pure far-distance setting may not be best for walking, driving on private property where legal and appropriate, or moving around obstacles. It is possible to emphasize the ground and obstacles in the foreground rather than the horizon.
This is where beginners become frustrated. They want it all: sharp boots, sharp brush, sharp fence posts, and sharp distant terrain. Analog monocular focus is not like this. For the next task, select the distance that is most important and make minor adjustments as necessary.
Weather can also alter the sharpness of the world. Rain, fog, and cold can diminish contrast or cause moisture issues similar to focus problems. Before you blame your focus settings on a wet night, read the NV Guide USA guide to night vision in bad weather.
Weapon-Mounted or Rifle-Adjacent Use
Never take for granted that a helmet focus setting is right for use near a rifle. If a monocular, clip-on, or similar device is to be used in the vicinity of a weapon system, follow the instructions in the device manual, mount instructions, and all safety guidelines. This article should not be considered legal or tactical advice.
Simply: from a focus point of view, the optical task changes. It may require a different setup if the device is used for navigation, scanning, or peering through/around another optic than if the same monocular is strapped to a helmet for movement.
To learn more about mounting, NV Guide USA features a rifle night vision mounting guide. Do not use it as a replacement for your manual or local rules; use it as equipment context.
When Blur Is Not a Focus Problem
Sometimes the focus rings are fine. The problem is somewhere else.
Dirty Lens, Moisture, or Condensation
The image may appear soft due to a fingerprint on the eyepiece, dust on the objective, rain droplets, or internal/external fog. Check the glass before touching the focus. Blow off loose debris first. Use correct lens-cleaning tools. Never rub dust into the coating using a dirty shirt.
Condensation can be particularly deceptive as it can make the image evenly soft, which may be confused as bad focus. When the device is taken out of cold storage and exposed to humid air, allow it to equilibrate and examine the lens surfaces.
Tube Blemishes or Phosphor Damage
Tube blemishes do not equal focus blur. A blem typically is a stationary location or marking that remains in place when you move the device. Focus blur will vary according to distance and lens adjustment.
Permanent shadows, ghosting, and dark areas may occur due to phosphor damage or bright-light damage. If damage is suspected, discontinue testing around bright light and test under safe controlled conditions. Check out the tube damage guide for a description of what to watch for.
Poor Specs or Unrealistic Range Expectations
A cleanly focused low-spec tube remains a low-spec tube. Focus cannot provide signal-to-noise ratio, resolution, or photocathode sensitivity that the device lacks. When the scene is very dark, or the tube is not working well, the picture may be noisy and lack contrast even if it is optically focused.
It is here that users confuse blurry night vision and unrealistic range expectations. You might be focusing on the right thing and still not see the details at the distance you wanted. It is a performance limitation, not a focus-ring issue.
Digital Night Vision and Thermal Devices Operate Differently
Digital night vision and thermal devices do not focus precisely like an analog PVS-14-style monocular. Other digital units have menus, sensors, fixed focus, or other lens controls. Thermal devices do not see reflected visible/near-infrared light, but rather heat, and the sharpness of the image is dependent on the resolution of the sensor, the display, the lens focus, the NETD, and the contrast of the environment.
Never apply analog night vision diopter vs objective focus advice to every kind of device. Understand and use the manual, and know what technology is being used.
Quick Troubleshooting Checklist
Do not assume your night vision device is defective; if you are wondering "why is my night vision blurry?", follow this checklist:
- Go to a safe place with low light. Avoid direct sunlight or intense light sources.
- Check the objective and eyepiece for fingerprints, dust, rain, or fog.
- Adjust the eyepiece diopter so the image in the tube is easy to see and clear to your eye.
- Do not change the diopter setting; focus the objective to the actual distance of the object.
- If close objects are clear and in focus, but distance is not, refocus the objective farther away.
- It is normal if distance is clear and hands are not, as long as you refocus close when close work is needed.
- If the picture is grainy but edges are distinct, it could be grain/scintillation and not blur.
- Check helmet mounting, eye relief, and eye position behind the eyepiece.
- If it is extremely dark, compare the image under better ambient light or using an adequate IR illuminator.
- If fixed spots, ghost images, or dark patches remain under controlled conditions, check for tube blemishes or damage.
Quick FAQ:
- Why is my night vision blurry? The most common cause is incorrect setting of the diopter or objective focus for your eye or target distance.
- What should you set first: diopter or objective focus? Choose the diopter first and then use the objective focus to set the distance.
- Does a PVS-14 have close-up capabilities? Yes, but when focused up close, distant objects will typically soften.
- Is there any difference between grain and blur? Yes. Grain is noise in the image, typically due to low light or tube performance limits. Blur is a focus or optical sharpness issue.
Bottom Line
How to focus night vision is not difficult to understand, provided you do not think of both rings as a single control. The diopter allows adjusting the eyepiece to your eye. The objective focus brings the outside world into focus with the tube. Set them in that order.
In most cases, when someone complains about blurry night vision, it is not that they need a new tube, new housing, or a more expensive helmet. The fix is a clean lens, correct diopter setting, correct objective focus distance, and a mount that positions the ocular where your eye normally rests.
If it is still poor after that, you can begin to consider lighting conditions, tube specifications, blemishes, moisture, or actual device issues. However, start with the basic focus setup first. This is free, it avoids misdiagnosis, and it is one of the first things every analog night vision user should learn.
IR Illuminator Not Working With Night Vision? Beam, Battery, Focus and Compatibility Check.
Is your NV not turning on? Battery, Contacts, Mount and Tube-Safe Troubleshooting
Night Vision Collimation and Alignment: Fix Double Vision, Eye Strain and Dual-Tube Setup Issues