
June 22, 2026
How to Clean and Maintain a Thermal Scope: Lens Care, Battery Storage, and Field Checks
A thermal scope isn’t simply a glass sight that has batteries inserted. It is an electronic camera, display, processor, power system, aiming system and weather-tight optic, attached to a rifle. When you treat it casually, little issues can seem like a bad scope: smeared image, short runtime, corroded contacts, lost settings, wet case, and a zero that doesn’t seem like it can be trusted.
Thermal scope maintenance is not difficult. If the discipline is doing the same thing over and over again, dry it before you store it, clean the lens properly, store the batteries the correct way, inspect the mount, and write down anything that is out of the ordinary before memory starts altering the story.
The Short Version
Maintenance is part of the field rule of zero confidence
Only when I know I can rely on the lens, battery, mount, profile and image settings am I fully confident in the rifle. Thermal scope care is not about getting product to shine. It’s about preventing failure before it happens and that can be controlled.
After every hunt:
- Let the optic dry before sealing it in a case.
- Clean away loose dust prior to wiping any surface.
- Inspect caps, ports, eyecup, mount, controls and battery compartment.
- Verify zero profile and document unusual behaviour.
- Change, remove or replace the batteries as specified by the battery type and manual.
Never dry-wipe dust on the objective lens. It should not be assumed that household glass cleaner is the default. Never charge a battery that is frozen. Avoid storing damp equipment in foam for extended periods.
Why Thermal Scope Maintenance Matters
Thermal cameras are not ordinary glass scopes, but electronic cameras
The image is captured by a thermal optic that collects infrared energy using a special front lens, processes the energy from the sensors, and presents the image on a small screen. The reticle, the zero profile, the firmware, the battery state, behavior of the NUC, display settings and mount – all of this is important.
This is because thermal optic maintenance is more than just scope cleaning. As much as a smudged lens, a dirty battery contact, loose QD lever, wrong profile, bad external power cable or damp case can ruin the hunt. The Thermal Scopes & Imaging section of NV Guide USA includes thermal scopes in general.
Little care errors can equal large issues
Oily lens can cause the image to look soft. If the scope’s focus setting is incorrect, anything that is clean will look bad. Failure of contacts due to corrosion can result in power failures. A loose mount can appear as a scope that won’t hold zero. Settings may be reset, or a profile check may be needed with a firmware update.
Don’t be quick to point out the optic, first eliminate maintenance issues from the list of problems. If the image is blurry, follow this how to focus a thermal scope. In the event the rifle points in a new location, it is crucial to not neglect to do mount and target checks, and that’s exactly what NV Guide USA’s article titled thermal scope losing zero does.
After-Hunt Thermal Scope Routine
Ensure the optic is dry before placing it in a case
It is not immediately placed in foam after rain, fog, or snowy or damp nights. I clean the outside, put it in the case when I return home and allow the optic to dry in a safe indoor area. Only open caps in a clean and controlled environment.
Allow the scope to acclimate if it had been carried from cold weather into a warm room. If you open a cold sealed case in warm humid air, condensation can occur on the cold surfaces. IP ratings are helpful in the weather, not in eliminating bad storage. For the limits of weather resistance, see NV Guide USA’s guide to night vision IP ratings and waterproofing.
Examine outside, ports, mount and battery compartment
After removing loose dirt, use a clean microfiber cloth for the housing. Use a soft brush first around buttons, focus rings, USB covers, battery caps, and turret type controls. Avoid grinding mud or sand in the parts you need in the dark.
Follow the same rapid scan each time:
- Objective cap opens and closes without cleanliness issues.
- Eyecup is not torn or folded.
- Charging or data port cover is seated.
- Battery cap or latch is not cross-threaded and is clean.
- Contacts are dry and not corroded.
- Mount is in the correct slot for the rail.
- No movement of QD lever, crossbolt or ring hardware.
- If you use witness marks, they’re still in line.
If anything moved adjust the mechanical set up first and then digital zero. Follow NV Guide USA’s guide on how to mount a thermal scope for the deeper mounting process. Never make up torque values, always use the scope and mount manufacturer’s torque figures.
When the hunt is fresh, document any issues
If the scope froze, stopped, drained abnormally quickly, lost a setting or appeared unusual after NUC, record it. Specify the temperature, type of battery, use of external power, if known, the type of firmware, profile, rifle, ammo, and whether the scope was wet or cold. Good notes make thermal scope troubleshooting evidence.
How to Clean a Thermal Scope Lens
Use air or soft brush first
The first and safest step in cleaning a thermal scope lens is to remove loose debris, but not use the drag technique. Clean with a hand blower or clean soft lens brush. When using air, do not use direct high pressure blasts and do not use anything that may spit propellant or moisture on the lens.
The idea is very straightforward: get rid of the grit before cloth, tissue or swab even gets close to it.
Dusty thermal lens should never be dry-wiped
Many thermal optics have a front cover that is not a normal window glass. Germanium or other IR transmissive material with special coatings are used to make thermal objective lenses. A dusty lens and a dry cloth can make fine sand paper.
The first cleaning habit to break: when someone sees a spot, pulls out a shirt tail and cleans the entire objective. When the lens is covered with the dust, mud film, or grit, stop and remove the loose particles first.
Optic-safe materials must be used
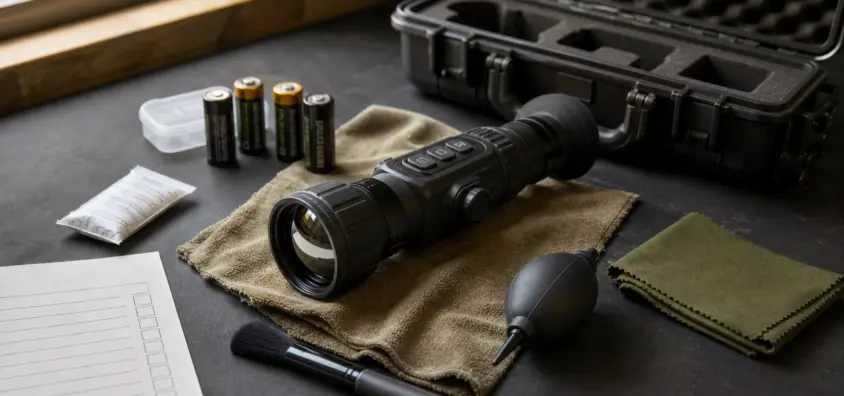
A thermal scope cleaning kit shouldn’t be boring:
- Hand blower
- Soft lens brush
- Microfiber cloths used exclusively for optics and kept clean.
- Lens tissue and swabs made for optics
- Manufacturer approved lens cleaning solution
Don’t default to household glass cleaner. No aggressive solvents or paper towels, dirty rags or abrasive wipes should be placed on a thermal objective lens. If your manual lists any particular instructions for the germanium lens or coating, follow them first.
Lightly clean and know when to stop
After all loose debris has been removed, gently clean from center to outside with fresh clean surface as necessary. Do not press hard. Avoid overfilling the lens with fluid. Avoid putting cleaner near seams (except as directed in manual).
Any small mark doesn’t always require a cleaning. Excessive cleaning can be worse than the small cosmetic spot that does not impact the image. Wipe down when dirt, fingerprints, water spots or mud are present on the lens or could cause damage to the lens if left on.
Germanium Lens Care
Germanium is used in many thermal scopes as the objective lens because it has the ability to transmit long-wave infrared energy. This doesn’t imply that every lens, coating or cleaning technique is produced equally by different brands. Some coatings may be harmed by the use of an incorrect solvent or by the use of abrasive cleaning.
Hence, the proper answer to how to clean thermal scope lens begins with manual, not a shortcut from a forum. Follow the manufacturer’s instructions for the cloth, solution, or method to use. If it says to avoid alcohol, ammonia, acetone, compressed air, or to avoid some wipes, obey the warning. The key words for a clean germanium lens thermal scope routine are low pressure, clean materials, and minimal contact.
Battery Care for Thermal Scopes
The rules change with battery types
Thermal scope battery care depends on the system. Different types of batteries, such as internal lithium-ion packs, removable proprietary packs, CR123A cells, 18650-style cells or external USB power banks have different storage and charging guidelines.
NV Guide USA has a more in-depth guide on thermal scope battery life (internal vs removable batteries, power banks, cold weather).
Remove batteries for storage if possible
If the scope uses removable batteries and the manual allows removal for storage, take them out prior to extended storage. This decreases leakage and corrosion risk, and prevents slow drain. If using internal batteries, refer to manufacturer storage instructions. Many lithium-ion devices are better stored at a practical partial charge, rather than discharged completely for months.
Allow cold batteries to warm before charging
Cold weather causes shorter run times and can cause a good battery to appear weak. Charging is different. Never charge batteries at temperatures outside manufacturer’s recommended temperature range. Warm cold batteries in a safe indoor location before charging.
If scope flickers, or turns off and/or appears to be dead, check contacts first before accusing electronics. Check for dampness, green or white corrosion, bent springs, dirt, torn wraps on rechargeable cells or unseated cap. Thermal scope contacts corrosion can be mistaken for more serious issues.
Moisture, Condensation, and Storage
IP ratings do not indicate that wet storage is safe
Weather resistance is useful in wet grass, rain or snow. It does not indicate that wet equipment must be packaged in foam and stored. Moisture is a threat to screws, mounts, contacts, straps, case foam and accessories for long-term use.
I prefer rechargeable desiccant packs in the hard case for thermal scope case storage. They are low cost insurance but certainly not magic. A pack that gets full without ever being recharged is wall art. Allow the optic to dry before storing with desiccant.
In general electro-optic storage habits, see NV Guide USA’s guide on how to transport and store night vision gear.
Don’t store them in poor locations
Do not leave the scope in a hot car, damp basement, wet soft case or sealed case with wet gloves and straps. When using thermal scope cold weather storage equipment, avoid temperature extremes, if possible, and provide the equipment time to acclimate before use or charging.
So to answer the question: "What is the best way to store a thermal scope for the off-season?" you should consider the following factors: clean, dry, protected, batteries managed, desiccant monitored, and settings documented.
Transport and Case Setup
A hard case is more suited for flights, rough roads, UTV rides, and shared transportation in a truck. When the rifle isn’t being beaten around and for short controlled movement a soft case can be used. Whatever the case, the scope shouldn’t bounce or rest on hard accessories.
Keep objective lens and eyepiece in place, protect ports, mount and controls. Loose magazine, rangefinder, tripod head or tool in the same case can harm equipment in transit.
Please check scope after a long drive or rough ride before the hunt. Check the mount, lens caps, battery, profile and image. A live fire confirmation may be warranted if the rifle was bumped hard and where safe and legal. Use an accurate thermal-visible aiming point when confirming zero. NV Guide USA’s guide to the best thermal targets for zeroing a scope states why a large warm blob is not a good target.
The firmware, settings, and data hygiene
The importance of thermal scope firmware update discipline. Firmware may enhance performance, reset settings, modify menus, modify profiles, or necessitate setup checks. I do not change firmware just prior to a big hunt, unless I have a pretty good excuse and a way to check the outcome of the change in camp.
Update at home or controlled range day. Charge the battery before use. Read release notes. Just note down the previous and new firmware versions. Verify profile and settings post update.
Keep a simple log:
- Serial number and model
- Firmware version
- Rifle, mount, rail slot
- The state of ammunition and suppressor
- Active profile and zero distance
- Reticle and image settings baseline
- Battery type
- When it is updated, fails or does not behave as expected
Avoid changing three variables at a time when troubleshooting. For settings and discipline of profile see NV Guide USA’s guide to thermal scope settings.
Pre-Hunt Thermal Scope Field Checklist
Prior to serious hunting:
- Lens is clean and objective cap & eyepiece work.
- Diopter clears up reticle and menu text.
- Objective focus is active over anticipated ranges.
- Battery is charged and there is a spare battery/power bank.
- If you use an external cable then the fit is confirmed.
- Mount, Rail slot, Witness marks, QD lever and Screws are correct.
- Rifle, ammo, suppressor state, zero distance and reticle and profile are correct.
- Scope has heated up sufficiently to settle.
- NUC / calibration has been performed as per the manual and conditions.
- Brightness, contrast, palette and focus are usable through night.
The NUC does NOT move the barrel and does NOT clean the lens, but helps uniformity for the sensor and image consistency. NV Guide USA expounds on this in thermal NUC explained.
Maintenance issues that cause unnecessary issues
The typical errors are known:
- Abrasion of the lens by the application of grit.
- Keeping the optic in a closed case while it is wet.
- Removable batteries left in for the off-season.
- Rapid charging of a battery that has been frozen.
- Neglecting to check the mounting and going for digital settings.
- Updating firmware immediately prior to a hunt without checking settings.
Any of those can give an impression of a bigger symptom. A dirty lens will appear as poor image quality. A wrong profile looks like a zero problem. A weak battery is a symptom of an electronics issue. A loose mount seems like a bad scope.
When Maintenance Is Not Enough
If the lens is cracked, the port is broken, the battery pack is defective, the profile system has been corrupted, there is a reticle tracking problem, an internal shut down problem, or a true point-of-impact shift from a hardware failure, maintenance will not be able to resolve the issue.
If you are seeing repeated shutdowns with known good batteries, water intrusion, internal fogging, profiles changing without your input, charging faults with approved charging gear, or impact shifts after mount, ammo, profile and target, and shooter variables have been controlled, contact the manufacturer or qualified support.
Record the serial number, the firmware version, the type of battery, charger, mount, rifle, ammunition, suppressor status, weather conditions, target type, and failure pattern. Photograph the mount, lens, battery compartment, contacts and target (if live fire is to be conducted).
Practical Maintenance Schedule
Following each hunt: dry the optic, check exterior, caps and ports, battery management, and note unusual behavior.
If rained on, fogged, covered in dust, mud or rough truck ride: perform deep cleaning and inspection. Inspect for moisture, grit, case condition, and mount movement and battery contacts.
Once a month while active season: recharge/replace batteries, check desiccant, check firmware version, check profile notes, check mount witness marks, and power the scope on and take a basic image.
Preparing for long-term storage: clean as necessary, dry them completely, remove any removable batteries (if permitted), recharge the pack of desiccant, and store the scope in a stable and dry environment.
Prior to a big hunt or trip: complete the complete pre-hunt checklist. Zero the rifle/optic if rough transportation, optics change or rifle setup change occurred.
Quick Answers: Thermal Scope Maintenance FAQ
Can I use alcohol wipes on a thermal scope lens?
Only if your manufacturer specifies that it is OK for that lens and coating. Don’t trust alcohol wipes to work, even if they cleaned up sunglasses or a phone screen.
Is it possible to use compressed air to clean a thermal scope?
Use caution. Gentle hand blower should be used instead of high pressure canned air. Do not subject to close blasts, propellant residue, moisture or force grit into lens edges or ports.
Do I need to take the batteries out of a thermal scope when storing it?
Typically yes, if removable batteries are used. If using internal batteries, store per manufacturer’s instructions.
How to avoid condensation inside the thermal scope case?
Dry optics prior to storage, do not seal wet gear in foam, carefully acclimate cold optics, and use rechargeable desiccant packs.
Can thermal scopes be updated?
Sometimes. Firmware update is introduction of changes to fix up issues or add features, but should be performed in a controlled environment. Write down version, read notes, charge batteries and re-check profiles afterwards.
Can insufficient maintenance cause a thermal scope to lose zero?
Loose mount, wrong profile, weak battery, bad target, dirty lens, and transport damage are all symptoms indicative of poor maintenance that can be interpreted as "zero problems." It might not move the bullet on its own, but it may obscure the true cause.
Final Field Rule
Use the basic care checks prior to faulting the optic. A reliable thermal scope is one that is powered and dry with the documentation, and more reliable than a wet, unpowered, undocumented scope.
Thermal scope care doesn’t mean "babying" gear. It’s about managing issues that can be prevented: lens scratches, wet cases, battery failure, contact corrosion, loose mounts, incorrect profiles, firmware upgrades in a hurry. Once those things are taken care of, field issues can be diagnosed more readily and confidence in the rifle is not founded upon hope.
IR Illuminator Not Working With Night Vision? Beam, Battery, Focus and Compatibility Check.
Is your NV not turning on? Battery, Contacts, Mount and Tube-Safe Troubleshooting
Night Vision Collimation and Alignment: Fix Double Vision, Eye Strain and Dual-Tube Setup Issues