
July 16, 2026
IR Illuminator Not Working With Night Vision? Beam, Battery, Focus and Compatibility Check.
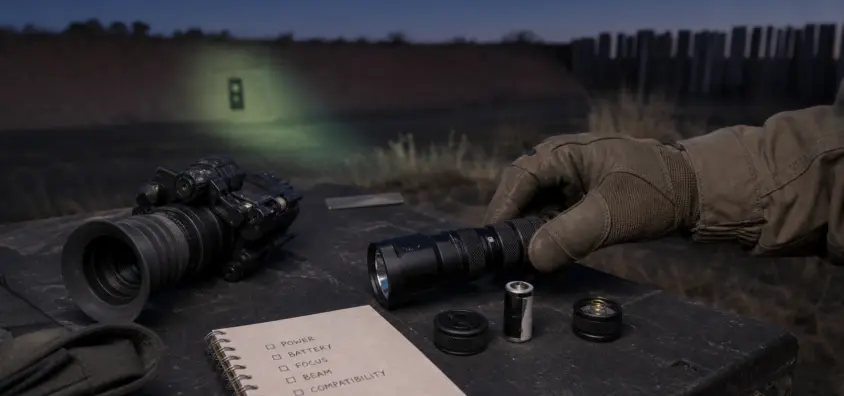
Most users first think of the expensive end of the scale: bad image intensifier tube, bad laser device or wrong setup when the IR illuminator stops working. It’s typically easier. A ‘dead’ unit may be due to a weak battery, incorrect mode selection, tight beam, bad pressure pad, 940nm wavelength or foreground splash.
This is a troubleshooting guide and not a buying guide. I’m going to approach the problem as I would in the field: test the night vision device, test the power, test the switching, test the wavelength, test the beam focus and aim and then determine if the illuminator itself is broken. Never open a sealed illuminator, bypass a laser/IR module, or modify electronics. Stop and call the manufacturer if the unit is damaged, hot, leaking, and/or flickering excessively.
The Short Version: What to Check First
If your night vision IR illuminator not working issue occurred immediately prior to a hunt or range session, check your IR illuminator per this list:
- Test the night vision device to see if it operates in low light without the use of the illuminator.
- Install new, proper battery; check battery polarity.
- Test tailcap, lockout, pressure pad, remote switch, momentary and constant-on mode.
- Range – test at 10-25 yards on a matte surface prior to judging.
- If the unit has flood/spot adjustment, widen the beam!
- Point the beam at the true night vision view, not just based on mount position.
- Check the wavelength, 850nm is typically brighter than 940nm.
- Watch for splashback off walls, brush, fog, rain, snow, dust, vehicles or barricades.
- If image is washed out rather than dark, adjust gain or brightness.
- Cease operation if the unit smells burned, becomes unusually hot, leaks or flickers after impact.
It eliminates many issues with night vision illuminator troubleshooting without purchasing anything.
First, Make Sure the Problem Is Actually the Illuminator
If you suspect that the accessory is at fault, first determine that the night vision device is operating as expected. An IR illuminator beam not visible problem can be simulated by a capped objective, poor focus, poor test environment, or a dead monocular battery, or a low gain setting.
Move to a safe dark spot that has good contrast, for example a fence line, a tree line, a dirt berm, a shed wall, or a field edge. Correctly focus eyepiece and objective. Before diagnosing the illuminator, follow NV Guide USA’s guide to diopter and objective focus if focus is not clear.
If there is moon, sky glow or ambient light in the vicinity, there should be some structure in the scene even when illuminator is off. If the image is completely black, but you know there is light in the scene, you might have a night vision problem, not an illuminator problem. Refer to how image intensifier tubes work for information on tube basics.
Avoid diagnosis of analog NV in bright light or against white garage walls. Autogated tubes can clamp down, and close reflective surfaces can "bloom" under bright ambient light. To learn more about the behavior, NV Guide USA breaks it down in simple terms: auto-gated tubes for night vision in simple terms.
Many ‘dead illuminator’ problems are caused by battery, contacts and switches.
The most common IR illuminator battery problem is boring, meaning a wrong cell, a weak cell, reversed polarity, a dirty contact, a loose cap, or a problem with the pressure pad.
Use the battery type recommended by the manufacturer. Not all CR123, 18650, 18350, AA or rechargeable alternatives are necessarily right. Some devices consider voltage, protected cells, button-top length and cold weather sag. If the beam was good on the previous trip and poor tonight, try changing the battery first. The same applies to the NV itself, refer to NV Guide USA’s battery life guide.
Now, look at what you can see without taking the unit apart. Check for oil, corrosion, broken or crushed cables, and for plugs that are not in place. If the illuminator operates with the onboard button and not when using the remote switch, then the pressure pad or cable is to blame. If it flickers when you shoulder the rifle, grip the handguard or load a bipod, recoil or cable tension may be stressing a weak connection.
Flicker is evidence. A clean no-output failure indicates lockout, battery orientation, mode selection or hardware failure. Intermittent output generally indicates contacts or switch or battery movement or mount pressure.
Verify that the Illuminator is in the proper mode.
Many night vision accessories feature visible lasers, IR lasers, IR illuminators, white light, low/high output, lockout positions and programmable switches. In the dark, it’s easy to switch to the wrong channel.
It is easy to make an IR laser vs IR illuminator error. The IR laser is a highly focused aiming point. IR illuminator is a flashlight that uses infrared light. If a small dot is visible but no usable light appears on the scene, the pointer might be the one that is being used instead of the illuminator. If it’s aiming that is the problem, NV Guide USA has a full comparison of IR lasers vs IR illuminators, and a separate guide to zeroing IR lasers, red dots, and clip-ons.
Practice using the controls during the day before the night shoot. Verify lockout, power level, momentary, constant on and remote switch operation. Never study switchology in the dark with a loaded rifle.
Wavelength Compatibility: 850nm vs 940nm
The 850nm vs 940nm IR illuminator question is a false alarm question. 940nm can be operating just fine and still appear weak in analog night vision.
The majority of analog tubes are very sensitive to standard 850nm illuminators. The drawback is that the emitter produces a subtle red light. A 940nm illuminator usually has less visible glow, but many analog devices will perceive it as less bright. If your PVS-14 IR Illuminator is good at 850nm and poor at 940nm, it might not be a fault, but rather a wavelength response.
If you are asking “why can’t I see my IR illuminator?” then test close first. A beam that is faint at 15 yards and poor at 100 yards might just be too far out of the useful range of the device and scenario. This is not necessarily the case for digital night vision, which can actually have different responses depending on the design of the sensor and IR filter. Thermal optics are yet different: an IR illuminator won’t help to brighten a thermal image because a thermal device is sensitive to heat, not reflected IR light.
For more information on selecting and using IR light under night vision, check out NV Guide USA’s IR illuminator guide-night vision.
Beam Focus and Aim: The Illuminator May Be Working But Pointed Wrong
If the IR illuminator not showing on night vision problem appears, it may be a beam issue and not a power issue. A tight spot can miss the field of view. At a distance, a wide flood may appear as an IR illuminator weak beam.
Start close and wide. Find the beam at 10-25 yards on a non-reflective surface. Subsequently, narrow the IR illuminator focus and increase the distance. Useful for walking, woods and close work – flood. Spot is great for open fields and longer shots. Flood at 150 yards can make a good unit look weak, tight spot at 20 yards can make a hot center and dark edges.
Alignment matters too. The rifle mounted illuminator may not be pointing in the direction of the optic. The light on a helmet can follow the helmet shell, NOT the monocular. See the night vision device and adjust the beam in the view. The overall fit and helmet’s mounting system is important for helmet users, check out night vision helmet setup.
Never make judgements about the IR illuminator range based on marketing numbers. Terrain, tube performance, wavelength, humidity and reflectivity of the target are all important. NV Guide USA’s article on night vision detection range explains why real usable distance is not the same as ideal detection distance.
The image is too dark, washed out, or blown out.
If the night vision too dark with IR is still a problem after using a new battery and doing a close beam test, test if the light is actually lighting up the area you are looking at. If the flood is weak, very little energy may be placed on a distant target. A tight spot might be aimed just outside the frame.
The other issue is an "IR illuminator washed out image." Excessive IR on objects in the foreground can cause the foreground to appear bright and the background to appear dark. IR can reflect back into the tube from white walls, pale dirt, reflective signs, wet leaves, suppressor covers, barricades, brush and vehicle hoods.
Unfortunately, there is a lack of correlation between more power and splashback. Reduce output, widen the beam, clear the foreground distractions or change direction.
Manual gain can also fool you. Excessive gain may exacerbate bloom and noise. If the gain is too low, the beam may appear to be weak. If you are using a PVS-14 with manual gain, read NV Guide USA’s manual gain and brightness control guide and add gain to your checklist.
Environment and Field Conditions Matter.
IR can scatter due to fog, rain, snow, dust, humidity, smoke, and muzzle gas. The outcome is a bright wall ahead of you rather than light to be used downrange. This is a good field problem that NV Guide USA explained in their guide to night vision in rain, fog and cold.
Another popular pitfall is vegetation. The tube focuses on the bright foreground and the opposite side of the field becomes dark when the beam encounters leaves, grass at 5 yards. This is frequently observed in blinds, tree lines, vehicles and seated predator-control set-ups.
Different settings are required for indoor testing, woods and open fields. Low power is typically sufficient indoors. Controlled flooding is required in woods and careful foreground management. Need to add alignment, focus, and reasonable distances in open fields.
Mounting and Recoil Problems
If the illuminator operates as a handheld but does not operate on the rifle and/or helmet, then simplify the setup.
See if the mount is okay first. Loose or canted mount will cause the beam to be out of view. The plug can be pressurized by a rail cover, tape switch or cable routing error. Marginal contacts or tailcap fit also can be exposed by recoil. If the circuit flashes after shots, try direct activation, then the mount, then the remote switch and then the remainder.
This is fundamental night vision accessories troubleshooting: rebuild one part at a time until the fault is re-established.
When the Illuminator May Be Faulty
Once the battery, switch, mode, wavelength, focus, aim, gain and environment are checked, the illuminator may be faulty.
If the output is not present with new, correctly inserted batteries and direct activation, or heavy flicker appears with multiple batteries, or there is sudden output loss after impact, or water is present in the unit, or the batteries are leaking, or a burning smell is noticed, or the unit is very hot, or the lens is cracked, or the selector is broken, stop use and contact the manufacturer/seller.
Sealed illuminators or laser / IR modules are never to be opened. You can damage water-resistance, cause an eyesight hazard, invalidate your support or make the device unsafe.
Before a Hunt or Night Range Session, be sure to review this Field Checklist.
Prior to departure, verify complete set-up with configuration the same as that used:
- New batteries, night vision and illuminator.
- Backup activation method in the event of a failure of a pressure pad.
- Project a beam at short range.
- Set the flood/spot on the terrain.
- Beam aligned in the true night vision image.
- Understanding of gain and brightness.
- Local laws and range rules were consulted in respect of the use of IR.
Be prepared with a failure plan. If the illuminator fails, a handheld backup illuminator can be used, set can be relocated to a brighter area, shorter distance, or discontinued. It’s a bad idea to trouble shoot a loaded rifle in the dark.
FAQ
Can I use a phone camera to test an IR illuminator?
Sometimes. Near-IR light is visible in some phone cameras – filters differ. A phone test can be used to show that an emitter produces something, but doesn’t show useful range, focus or night vision compatibility.
Why does a red glow appear and the image is faint?
The emitter could be visible when the beam is unfocused, misdirected, weak, obstructed by brush, or simply too weak for the distance. Red glow at the source does not guarantee useful illumination on target.
Is 940nm better than 850nm?
Not automatically. 940nm is less visible emitter glow, but is less bright through analog night vision. 850nm will appear brighter and have a longer range but is easier to see.
Why is it not working in the field but in the house?
Walls are near and shiny inside. The beam has to reflect off of less cooperative surfaces and travel farther in an open field. Outside, it is more important to focus, output, wavelength, weather, and target reflectivity.
Can excessive IR harm night vision?
Utilize appropriately designed illuminators and follow manufacturer’s instructions. Never blast near reflective surfaces, do not look into a concentrated beam or use a damaged laser/IR device. If the scene blooms, use less light.
Is it my PVS-14 or the illuminator?
Test separately. Test PVS-14 in ambient low light and then test the illuminator in close-up with fresh battery and direct activation. If the PVS-14 detects other IR sources but not this one, suspect the wavelength, mode, output or the illuminator.
What do I need, an IR laser or an IR illuminator?
An IR laser may be required for aiming. If you want to see the terrain, or enhance a dark scene you need an IR illuminator. Both are used in many setups, but they cannot be interchanged.
Is your NV not turning on? Battery, Contacts, Mount and Tube-Safe Troubleshooting
Night Vision Collimation and Alignment: Fix Double Vision, Eye Strain and Dual-Tube Setup Issues

PVS-14 Depth Perception: How to Move Safely With Monocular Night Vision